
![]()
(Ultimo aggiornamento: 28/12/09)
![]()
Costruirsi una nuova barra
Il Chicken Loop è stato "inventato" ed annunciato pubblicamente nel 1999 sul grupo di discussione sul Kitesurf come riportato nel messaggio http://groups.yahoo.com/group/kitesurf/message/4358. Come indicato nei messaggi "risposte a", sia Ken Winner (North) che Don Montague (progettista di aquiloni per Naish) stavano ancora usando il sistema con il laccio di regolazione per regolare l'angolo di attacco di un aquilone a 4 linee.
|
From:
Hung Vu <http://sports.groups.yahoo.com/group/kitesurf/post?postID=fCgjrv_CejxTFff0mZbvi_g-RjB_3QFMRyXajIumyN26HGTnYGEV6Q-UyIFqYFypxqAsQhf22A>
|
Da quel momento il Chicken Loop ha sempre avuto maggiore popolarità diventando il sistema di controllo standard per la maggior parte degli aquiloni da kitesurfing inclusi i foils (come Flysurfer, Boom Vector, etc.) e lo Arc.
La Trappola Mortale
Mentre il Chicken Loop offre la più desiderabile delle capacità richieste nell'aquilonismo da trazione (la possibilità di togliere istantaneamente la potenza all'aquilone cambiando il suo AOA) rimanendo ancora in grado di pilotare sganciati dall'imbracatura, il progettista originale non ebbe l'opportunità di usarlo e estarlo completamente. Il Chicken Loop è PERICOLOSO perchè ha alcune poche e fondamentali it has a few fundamental safety flaws:
- Nella sua configurazione standard (quando Chicken Loop non era usato agganciato), tutto il sistema forniva la massima potenza. This first design flaw encourages the users to use the Chicken Loop 100% of the time (otherwise they will be overpowered and won't have the depowering capability any more). This bad habit is very dangerous as landing and launching hooking in is asking for trouble as any gust can send the kitesurfer toward dangerous hard objects on land. This 100% hooking in habit is also dangerous on the water near shore or near hard objects as the kitesurfer can get dragged rapidly toward any hard objects on the water (boat, piers, reefs, rocks, posts, other water users, etc.) or onto land. In the recent serious/fatal accidents involving the Chicken Loop (in Cabarete and Texas), the kitesurfers were in the water near shore and was dragged on to land before the serious/fatal injury. In comparison, most non-Chicken Loop riders normally unhook on land or when riding near shore or near hard objects.
- On the average, a Chicken Loop system needs around 16" to 18" range (less for smaller kites and more for larger kites) from the arm fully extended position (minimum power) to the arm compressed position (control bar very close to the body for maximum power). To be able to accommodate this range universally, the Chicken Loop has to be very small so the kitesurfer can bring the bar very close to the body. This is the second design flaw of the Chicken Loop system as such "arms compressed" position makes it very difficult to unhook (or even to hook in). This "hard to hook in and to unhook" further promotes the 100% hooking in habit.
- The third flaw with the Chicken Loop system is that it did not separate the safety system (the ability to unhook) from the depowering/empowering system. Worst of all, this flaw is also exaggerated by the first flaw such that to be able to unhook, one have to move the bar to the default state (maximum power state). The combination of these flaws make it virtually impossible to unhook in powered up situation.
These three fundamental design flaws have been proven very dangerous as a number of incidents in the last few years have demonstrated. Up to 2002 little has been done to address the danger of the Chicken Loop. After a stern warning email from the original designer to the Kitesurf mailing list (to ban the use of the Chicken Loop for safety reasons), many manufacturers have introduced quick release systems for their Chicken Loop systems (some other kitesurfers took a further step by bypassing the Chicken Loop and permanently connecting themselves to the kite via a quick release system). While these quick release systems do attempt to solve the third flaw, they do not address the first two flaws. By not addressing the first 2 flaws, they still promotes the bad habit of hooking-in (or shackling-in) 100% of the time. "Ease of hooking-in and hooking-out" enables/encourages a non-Chicken Loop kitesurfer to ride unhooked in questionable situations (on land, near shore, near hard objects, boats, rocks, piers, posts, etc.). When bad things happen, the non-Chicken Loop kitesurfer simply "drop the bar". A 100% in the Chicken Loop rider (or shackled rider) cannot get into that preventive position and has to "react" when bad things happen. Past accidents have shown that "reactive" mechanisms do not always work. Some examples of a quick release system failures are:
- L'estremo carico dell'aquilone bloccava il sistema di sgancio rapido
- La sabbia bloccava il sistema di sgancio rapido
- Sistemi di sgancio rapido arrugginiti si bloccavano
- Sistemi di sgancio rapido si ghiacciavano con molto freddo o tempo nevoso (poteva accadere frequentemente nel kiteskiing e nel kitesnowboarding)
- Sistemi di sgancio rapido si annodavano e rimanevano impigliati nei cavi
- Il meccanismo di attivazione dei sistemi di sgancio rapido non poteva essere posizionato ed attivato (era stato spostato in una posizione più isolata e irraggiungibile)
- Il sistema di attivazione del sistema di sgancio rapido si rompeva durante l'uso
- Un kiteskier o un kitesnowboarder non poteva attivare il sistema di sgancio rapido calzando i guanti da neve
- I componenti del sistema di sgancio rapido non funzionavano sotto un carico eccessivo
- Il sistema di sgancio di sicurezza può fallire a causa di situazioni e/o condizioni impreviste (come nella recente condizione in Cabarete - gennaio 2003 - dove un kitesurfer non ha potuto sganciarsi con il suo sistema di sicurezza a causa: "del snap shackle che era CONNESSO DIRETTAMENTE ALLA PLASTICA CHICKEN LOOP E NON SI E' SGANCIATO IN MODO ADEGUATO"). Ricordate che abbiamo bisogno di almeno 1 nuovo incidente per imparare una nuova "imprevista condizione".
- E la lista può andare ancora avanti .....
Per riassumere, il sistema di sgancio di sicurezza è una buona idea; comunque, va usato come dispositivo di riserva e non come sistema principale.
Obiettivi di Progetto
Il tentativo di questa pagina è quello di risolvere le carenze del Chicken Loop introducendo due nuovi mezzi di controllo istantanei del AOA che hanno i seguenti obiettivi progettuali:
- Minima potenza nello stato di aquilone libero (se il sistema non è usato, l'aquilone deve generare la minima potenza).
- Semplicità di sgancio e aggancio pe rincoraggiare a stare non agganciati in situazioni ambigue (su terra, vicino all acosta, vicino ad ostacoli, barche, rocce, moli, ecc.)
- Separazione del sistema di sicurezza dal sistema di controllo della potenza (o attivazione del sistema di sicurezza in una minima condizione di potenza).
- Più sistemi di sicurezza alternativi (di differente tipo: biologico, meccanico, ecc.) possono essere aggiunti facilmente.
- Offrire gli stessi vantaggi del Chicken Loop.
- Soddisfare tutti o il maggior numero possibile di stili di kitesurfing possibili con il Chicken Loop.
- Offrire più prestazioni ed incentivi per attrarre i kitesurfers ad usare il nuovo sistema al posto del Chicken Loop.
Prima di discutere il nuovo sistema, lasciateci provare a migliorare il Chicken Loop al fine di renderlo più sicuro.
Chicken Loop più Sicuri
Un chicken loop più sicuro è quello che può risolvere i principali difetti mantenendo le stesse caratteristiche del chicken loop.
Un chicken loop più sicuro è un chicken loop più grande delle dimensioni del loop principale. Mentre il sicuro chicken loop (SCL) non risolve tutte le mancanze, parzialmente:
- difetto 1: la condizione a riposo del SCL è ancora la massima potenza; comunque, da quando il SCL riduce la gamma di potenziamento/depotenziamento, lo stato di riposo sarà in qualche modo "potenza moderata" invece che "potenza massima".
- difetto 2: The SCL addresses this flaw fully as the arm position to hook-in or unhook is fairly comfortable with the SCL.
- difetto 3: The kitesurfer still have to empower the kite to be able to unhook; however, since the SCL limits the depowering/empowering range, in practice, the unhooking is difficult but may still be feasible in certain conditions.
So a SCL is not fully safe but definitely safer than the standard Chicken Loop as it may encourage the kitesurfer to ride unhooked in questionable situations (on land, near shore, near hard objects, boats, rocks, piers, posts, etc.). The main disadvantage of a SCL is that it has limited range (around 2/3 of a standard Chicken Loop). The other disadvantage of the SCL is that it makes the main harness line (the fixed loop or the main loop) harder to use and may be a bit inconvenient for a high-bar-load kites (or back lines flyer kites). This may not be an issue as for 2003, most modern kites are front line flyers (or having multiple connection points allow one to make it more a back line or a front line flyer).
Some modern expert kitesurfers actually ride fully powered up with the minimum power setting of the Chicken Loop (arm fully extended). This position facilitates one arm control of the kite (easier to control the kite one hand with the arm fully extended) to leave the other hand free for tricks (board grabbing, board off, etc.). These riders use edging and the trim strap to control gusts similarly to non-Chicken Loop kiters and may pull the bar in occasionally to gain more power from the kite. For those riders, the extended range of the standard Chicken Loop is not quite necessary and can benefit from the SCL without sacrificing much.
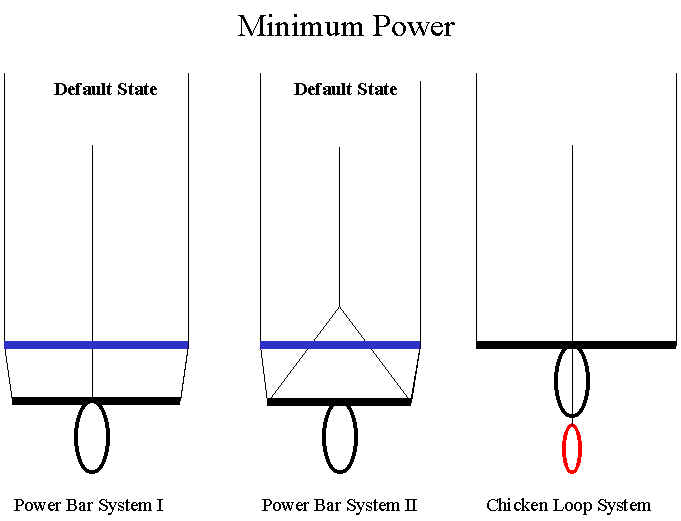
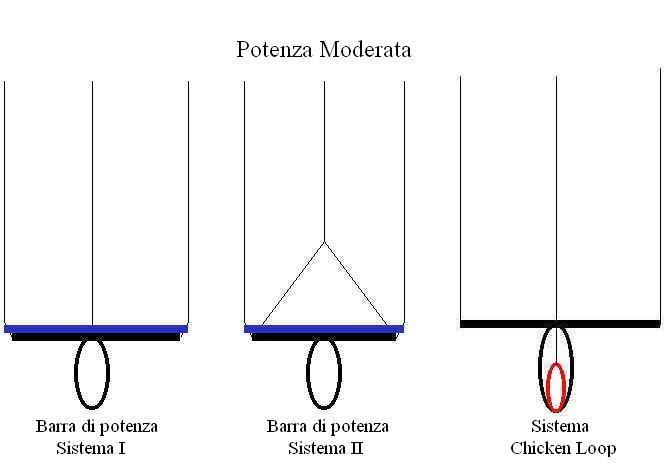
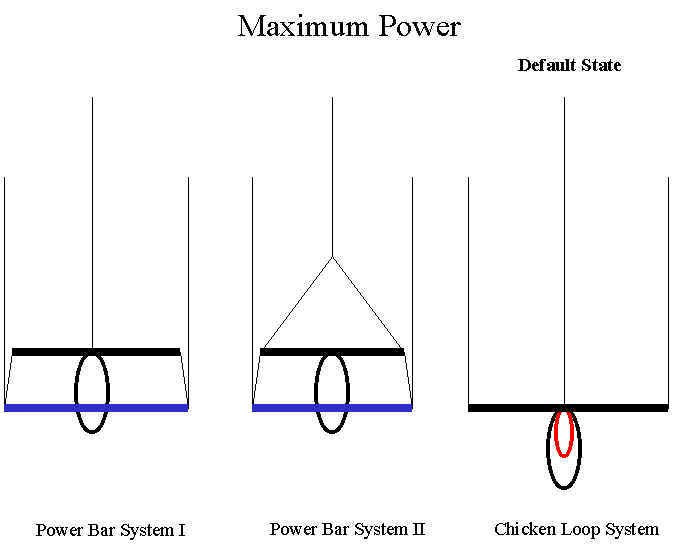
La Barra di Potenza
The Power Bar is one of the 2 designs on this page that fully addresses the 3 fundamental safety flaws of the Chicken Loop and meet all the design objectives stated above.
Instead of adding a Chicken Loop (shown in red in the following diagrams) to a non-Chicken Loop set up, the Power Bar design adds a single additional component, a Power Bar (shown in blue in the following diagrams). The Power Bar are connected to the back lines (around 8" from the main bar) allowing one to adjust the power of the kite independently from the main bar (so therefore does not interfere with the hooking-in/hooking-out activities). The kitesurfer can steer the kite using either the main bar or the Power Bar. For modern front line flyer kites, the Power Bar will not take the full load of the kite and therefore can be made of very light material.
The following diagrams show the different power states of the Power Bar system versus the Chicken Loop system (for simplicity, we don't show the trim strap and the safety leash). The Power Bar is shown of different length than the main bar for illustration purpose (the 2 bars can be of equal or much different lengths). The Power Bar I systems uses the classic line connections and the Power Bar II system uses "pulley bar" line connections for shorter bar length and faster kite turning.
Let's review the design objectives and see how the Power Bar system fits in:
- Minimum power default state: when the Power Bar is not use, the kite delivers minimum power.
- Easy to hook-in/unhook to encourage riding unhooked in questionable situations (on land, near shore, near hard objects, boats, rocks, piers, posts, etc.): hooking-in and unhooking is as easy as a non-Chicken Loop system. Furthermore, when the kitesurfer grabs the main bar (and release the Power Bar), the kite depowers (unless it was previously stalled) to allow even easier hooking-in and unhooking.
- Separation of the safety system and the depowering/empowering system (or activation of the safety system while in a minimum power state): The main bar used for hooking-in and unhooking is separated from the Power Bar which is used for depowering/empowering the kite. Furthermore, the kitesurfer hooks-in or unhooks while the kite is in minimum power state.
- More alternative safety system (of different types: biological, mechanical, etc.) can be easily added: A quick release system can be added on the main loop as a back up secondary safety device.
- Offer same advantages as the Chicken Loop: The Power Bar system offers the same full range instantaneous AOA control of the kite.
- Accommodate all or as much Chicken Loop riding styles as possible: The Power Bar system should accommodate most (if not all) Chicken Loop riding styles.
- Offer more features and incentives to attract kitesurfers to use the new
systems instead of the Chicken Loop: The Power Bar system offers a few more
features and incentives as follows:
- For a low-bar-load kite, the weight of the Power Bar can be tuned accordingly to offer automatic AOA control (similar to "automatic reefing" of the modern windsurfing sail). If this is tuned properly, one may not ever want to use today's manual AOA control again.
- Similarly, the connection between the main bar and the Power bar can be made of some elastic material to offer automatic AOA control. This can be used independently or together with the weight of the bar.
- A "pulley bar" line connection on the main bar can be used for shorter bar length and faster kite turning. This type of connection also makes it easier to grab the main bar at the center (necessary for certain tricks).
- The Power Bar system facilitates launching and landing unhook (for kites such as the Arc which may require instantaneous AOA control while launching - as claimed by some on the Kitesurf mailing list, the Power Bar system could also be used; however, it may be a bit awkward at first. The system described in the next section may be more suitable for that purpose.).
- Due to the ease of hooking in and unhooking, the Power Bar system allows the kitesurfer to perform both hooking-in tricks as well as non-hooking-in tricks.
- Due to the ease of hooking in and unhooking, the Power Bar encourages the good habit of riding unhook near shore or near hard objects.
- The Power Bar is not attached to the front lines as the main bar in a Chicken Loop system and therefore has more degree of freedom (allowing for 3D movement of the bar).
How To Make a "Prototype" Power Bar
Adding a Power Bar to you non-Chicken Loop set up is very easy:
- Buy a 1/2" to 3/4" diameter (thinner for front line flyer and thicker for back line flyer) wooden rod from Home Depot (around $2) and cut it to the same length as your main bar.
- Drill 1 hole (same thickness as your back leader lines) at each end of the new Power Bar.
- Make a knot on each back leader line around 8" from the main bar.
- Slide the 2 back leader lines through the holes at the end of the new Power Bar.
Voila, you now have a Power Bar on your existing set up (you can also tie a knot on the back leader lines just above the Power Bar just to make sure that it won't slide away from you - unlikely in most conditions).
Riding With a Power Bar
We made a Power Bar System II set up and managed to tried it on 3 back line flyer kites: AR5 11.5, AR5 5.5 and Black Tip 4.4 (we wanted to try it on the Ocean Rodeo and the Arc but the wind was too strong for the sizes we have). The main bar and the Power Bar are very short around 18 - 20". Here are some of our observations:
- Either the main bar or the Power Bar could steer the kite very well (even for the 11.5 with such a short bar length). The kite was more responsive with the Power Bar.
- The ends of the "^" line in the "pulley bar" configuration kept on touching our hands in this prototype. A production system should move those line-ends away from the kitesurfer's hand.
- In the maximum power position, the Power Bar felt heavier with the AR5 than the Black Tip (could be due to the differences in size). The Power Bar system should work better with a front line flyer kite in such case.
- We kitesnowboarded with the Power Bar set up and the everything worked out well.
- We found that the main bar did not interfering much with the rider when not in use (could be due to such short length)
- When not in use, the Power Bar did not interfere with the rider at all.
- We find that the "^" lines in the "pulley bar" configuration was a bit "jerky" when steering the kite. We move the knots closer to center of the "^" line and the "jerkiness" reduced.
- We did not have a line winder and found that we could wind the two bars closer together and then wind the lines between the 2 bars.
To sum up, the Power Bar II set up worked, the empowering/depowering worked as well as the Chicken Loop and the main bar did not interfere much with the rider when not in use.
Power Bar Safety Comparison
The following table shows a comparison of the safety options of a shackled-in rider, a Chicken Loop rider, a SCL Rider and a Power Bar rider (or non-Chicken Loop rider):
| Rider Type | Get into preventive positions (unhooked when launching and landing on land or when riding near shore or hard objects) | Unhook in case of emergency | Use of quick release systems in case of emergency |
| Shackled-in Rider | Potentially on land (need some elaborated procedure). No when riding. | No | Yes |
| Chicken Loop Rider | Potentially on land (need some elaborated procedure). Very difficult when riding. | Very Difficult | Yes |
| SCL Rider | Potentially | Potentially | Yes |
| Power Bar Rider (or non-Chicken Loop rider) | Yes | Yes | Yes |
"Yes" in the above means that the system supports and/or encourages the use of such device/procedure.
"Potential" means that the system supports and/or encourages with some degree of difficulty and/or extra efforts.
"No" means that the system does not support such use.
The 3D Bar
One of the major draw back of the "Power Bar" design is that it needs 2 bars instead of 1 bar. 2 bars may create line tangle during setup and kiting.
The obvious enhancement to the "Power Bar" concept is to make 2 bars in to 1 bar, a 3D bar.
The simplest form of a 3D bar is a "rectangle bar" (the bar is a rectangle).
A more complex form of 3D bars are multiple bars interconnected on both sides via a triangle (for 3 bars), a square (for 4 bars), a pentagon (for 5 bars), etc.
The back lines are connected to 1 bar and the front lines are connected to another.
Each bar in a 3D bar has a designated kite AOA associated with it.
By grabbing on any bar in a 3D bar, one can select the associated AOA of the kite. One can change the AOA of the kite (without hooking in) by grabbing another bar.
By hooking into one bar, one can adjust the AOA of the kite by grabbing and pulling on any other bar.

Il titolare, l'amministratore, l'autore e tutti coloro che hanno collaborato a questo sito non rappresentano nessuna garanzia riguardo ad errori, omissioni o incorrettezze delle informazioni contenute in questo sito web. Usare le informazioni quì contenute a proprio rischio e pericolo. Il titolare, l'amministratore, l'autore e tutti coloro che hanno collaborato a questo sito non sono responsabili per perdite o incidenti a voi o a terzi incluse le perdite di affari, le perdite di materiali, attrezzature o danni alle proprietà, lesioni o morte derivante da voi o terzi che utilizzano le informazioni quì contenute.