ritorna all'indice
delle FAQ
ritorna a
icmm home
|
ritorna all'indice delle FAQ |
ritorna a icmm home |
||
| SB-LIVE Midi Interface |
| Suggerimento : |
Attenzione
si consiglia l'eventuale realizzazione tramite
un esperto di elettronica onde evitare spiacevoli danni alla periferica
MIDI.
|
Building an interface for a Soundblaster/Sounblaster Pro.
The Soundblaster port
uses two pins from the 15 pin Joystick port to fascilitate MIDI. These
normally would be redundant +5V and ground connections pins. In the sound
blaster they are called MIDI TXD (Transmit External Data) and RXD (Receive
External Data) The signals to and from the Blaster are TTL logic signals.
Midi uses a current loop interface, so the job of the interface is to convert
between TTL levels and the MIDI current loop.If you want to use the MIDI
interface and the Sound Blaster joystick simultaneously, you could install
an extension from the 15 pin joystick port into the box and duplicate the
joystick port into the MIDI interface box along with the MIDI IN and MIDI
OUT ports. A MIDI THRU port could also be incorporated in the same box
where it is connected to the MIDI IN port, reversing the pin connections
4 and 5. The interface box then would contain MIDI IN, MIDI OUT, MIDI THRU
and a Joystick port.
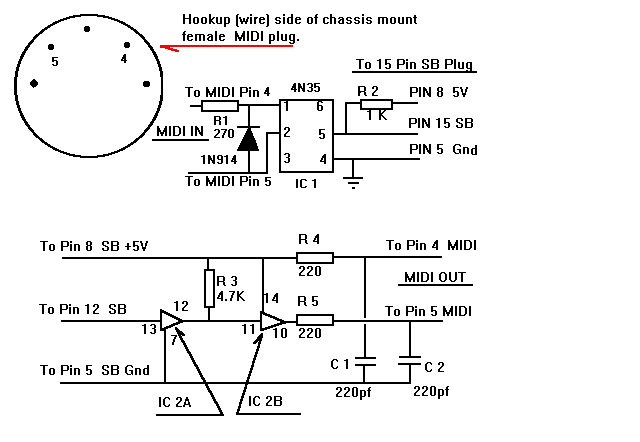
For simplicity, two schematics
are shown, MIDI IN and MIDI OUT, although they share the same +5V (Pin
8) and Ground (Pin 5) in the 15 pin joystick port.
The MIDI IN can only be connected to one external instrument (ie keyboard) but the MIDI OUT can support up to 5 MIDI instruments by installing for each additional instrument, a 220 Ohm resister from +5V to pin 4 (MIDI OUT), and a 220 Ohm resistor from buffer output (pin 10 on IC2 B) to pin 5 (MIDI OUT) for each additional instrument you want to add. You should also add a 220pf capacitor between each additional MIDI line and ground.
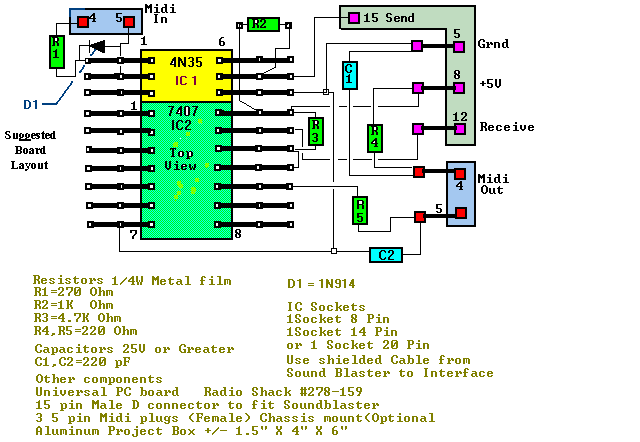
You can make your own
printed circuit board if you have the fascilities, however, Radio Shack
sells universal, small, ready made circuit boards which will serve the
purpose using some imagination and
jumper wires.
The two integrated circuits
(Chips) are a "14 pin dip" and a "6 pin dip", so a small board with dual
20 pin fascility would give enough opportunity to install the necessary
jumpers, resisters and capacitors.
TESTING:
A MIDI port requires
software to function. You can test the input portion with the FM Organ
program bundled with the Soundblaster. With the MIDI mode selected, MIDI
Note ON messages will play sounds from the soundblaster card, but only
the musical notes you have selected. For example, if you selected the key
of C, only the white keys will sound. To test the MIDI Out portion of the
interface, you can use any midi sequencer that supports soundblaster. All
of Voyetra's sequencers, Cakewalk, and Trax are examples of some that are
available. When you go shopping for a sequencer , make sure you specify
you have a Soundblaster. The interface is not compatible with Roland MPU
401! But that is not a majot drawback anymore. Most companies are now supporting
the Soundblaster but some have seperate versions - One for SB and one for
Roland. There are some shareware/Demoware sequencers available on the Creative
Labs BBS. You can reach them by modem.
A MIDI THRU can be created
by installing a third chassis mount female MIDI
plug on the interface
and connecting it directly to the MIDI IN.
Connect PIN 4 from MIDI
IN to PIN 5 of MIDI THRU
Connect PIN 5 from MIDI
in to PIN 4 of MIDI THRU
Run MIDI cable from instrument
(ie sequencer OUT) to MIDI IN on interface.
Run MIDI cable from instrument
(ie sequencer IN) to MIDI OUT on interface.
PARTS LIST:
Resistors 1/4 Watt ,preferrable
metal film.
R4,R5 220 Ohm
R1 270 Ohm
R2 1 K Ohm
R3 4.7K Ohm
Capacitors:
25V or greater
C1,C2 220pf ceramic
Diodes:
D1 1N914 or 1N4148
Integrated circuits:
IC1 7407 Hex Buffer 14
pin dip
IC2 4N35 Opto Coupler
6 pin dip
IC Sockets:
IC1 8 pin (Or one only
20 pin to fascilitate both chips)
IC2 14 pin
Other components:
15 pin male DB style
connector
Dual IC universal printed
board (Radio Shack #276-159) or ?
3 chassis mount 5 pin
din plugs 180'
Aluminum project box.
Approx 1.5" high, 4" wide, 6" long 1 15 pin DB
female connector if Joystick
port is desired.
+/_ 3ft of 4 wire shielded
cable. Note: Ground all shields.
Note: If Joystick extention
is required, a 12 wire shielded cable is required instead of the 4 wire
as previously indicated.
|
ritorna all'indice delle FAQ |
ritorna a icmm home |
||
| SB-LIVE Midi Interface |