Question:
What are your goals when you bring a microphone or line level signal into a console?
Answer:
To get it on tape (hard drive etc.) or to the speakers for listening.
This Q&A just summed up basic console signal path. You either want to record a signal or monitor it. It's either/or because the level that you would send to tape would not necessarily be the optimum level for a mix in the control room. Therefore it's a two step process to record and monitor a signal. This gives you individual control over control room volume and level to your
Microscoping Signal Path
When you bring a microphone into a console
one important thing happens. The level of the mic is changed from mic level
to line level. This is because the level that a microphone puts out, either
a condenser or a dynamic
mic, is too weak to record. It must be boosted to line level by the
mic pre-amp. This pre-amp is built into each I/O
and is the first thing that the microphone sees when entering the console.
Once the signal is boosted to line level it's speaking the language of
the console, tape machines, outboard gear etc.
Now your path is to the tape machine, not
to the speakers just yet. So on a console, one of the ways to get to the
tape machine is to go through a fader to a buss (another way is a direct
patch and we'll discuss that later). A buss is a common signal line and
is much like a city bus. It takes a number of signals (people, if you will)
to a prescribed destination (tape track). By assigning a signal to a buss
you assign it to it's numbered tape track. Note here that you still haven't
heard the signal. Your goal at this point is to get the optimum level onto
tape. Also note that the fader on the I/O you're using to buss to tape
is now called a channel fader. This name
can change with the job assigned to
it. If you're monitoring the tape machine with that fader, it becomes the
monitor fader.
The Rebound
Now after the level has been set you're
ready to listen to it. The signal is routed back to the console again and
is this time brought to a different I/O into the line input. The jump from
mic to line has already been made and you can come into the console with
less boost. This I/O is strictly used for monitoring your signal and setting
optimum level to the speakers and two-track. Each I/O gets to the speakers
through the stereo buss which is another conveyance that sums all the monitor
I/Os to stereo. Stereo is our standard way to listen at this point in time
(soon to change, keep your eyes here for an explanation in a future feature).
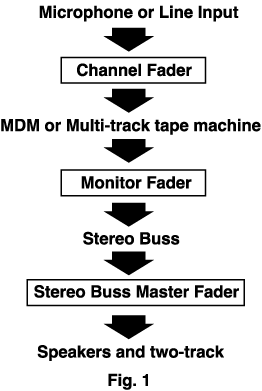
You can clearly now that the path is
a two part process. See the drawing below:

To sum up: Signal path on a recording or overdub session is a two-fold job. One fader (channel fader) is sent via the multi-track buss to the tape machine. Then this signal is brought back through the console through another fader (monitor fader) and is sent to the stereo buss so we can monitor it on speakers in stereo. This same signal is simultaneously sent to the two-track (DAT etc.). Next week we get into console design specifics and explore more about signal path. Signal path is the key to clean recordings.
Keep your eyes here next week for our multi part series on consoles.
I'd like to hear from you. Take a moment to write me and let me know how you feel about the content and links.
Consoles Part 2
The Basics
There are two basic architectures in the world of consoles. They are called split and in-line designs. On a split console (like the Mackie 1604) each I/O does ONE job. The signal comes in the channel, either line or mic, then goes to the multi-track or speakers depending on if you're recording or mixing. On an inline console, each I/O does two jobs. You are provided with two inputs and two outputs thus two faders. So you could use one path to go to the multi-track and the other path to listen to that signal from the multi-track. You'd have two faders so you could set optimum level to tape and then optimum mix level in the control room. All this on one vertical module. This saves a lot of space.
Two Consoles...Same Layout
Now let's explore how these two console
layouts would differ for the same session. Let's say you're recording a
full drum kit, bass, guitar and scratch vocals all at the same time to
two MDMs (ADAT, Tascam etc..). Your mic layout is as follows:
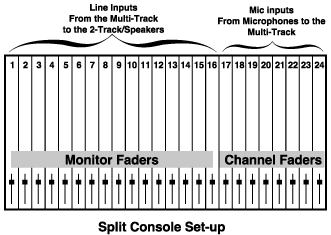
Do you see the problem with this set-up? You're short one mic input. However if you look at the inline set-up as follows, you'll see that on the same size console you have inputs left over. This is because the inline console has 48 true inputs. All squeezed into the same package as the split design.
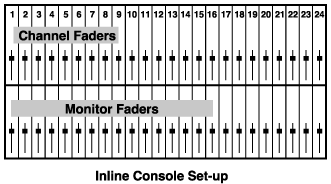
Keep in mind too that most inline consoles have a flip button that allows you to assign either fader to either job. This diagram is only one way to use the inline console. More about that later.
Recap
So now we know that the job you assign the fader tells you where that signal will go. A channel fader goes to the multi-track, a monitor fader monitors the output of that multi-track. Basic signal path is as simple as counting 1 to 5.
1. Microphone
or line input
2. Channel
Fader
3. Multi-track
4. Monitor
Fader
5. Speakers/2-track
These basic steps will work on ANY console
you may come across. It is the basic blueprint for signal path anywhere
you may go.
Consoles Part 3
The Basics
We've tackled basic signal flow and console architecture, this week we will start taking apart the console section by section and exploring their functions in depth.
The Stereo Buss Master Fader
There are three kinds of faders that
you will run into on a console. One of these is the Stereo Buss Master
fader. This is one stereo or two mono faders that control the level of
the stereo buss. Think of the stereo buss as the collection point that
all the monitor faders feed on their way to the speakers and two-track.
When you hear a song fade out on a CD it's the Stereo Buss Master fader
that the engineer used to do the fade. It's very important when building
a mix that you make a special effort to "fill up" the stereo buss. You
would determine this by looking at the stereo buss meters. Too little level
and you'll have to make it up at the two track or crank your speakers in
the room. This would add unnecessary noise from your power amp or two track's
input. Too much level on the stereo buss and you'll use up the headroom
of the board and cause distortion. You want to hit the stereo buss so that
on the peaks it's in the red at about +2. Not all meters are created equal
however. Analog meters are my favorite (the kind with moving needles) They
average the peaks and give you a good idea of how hard you can hit a console
or a tape machine. In general digital meters, even in VU mode, are much
more responsive to level and give you the impression that you're using
more headroom than
you actually are. It's a good practice
to compare any digital meters to an analog meter just to see where you
stand.
The Monitor Fader
If you read last
weeks feature, you'll see that the monitor fader is the fader that
receives the line inputs from the multi-track tape recorder. If you've
used up all your multi-track outputs and have faders left over, you can
use these extra faders to bring back more line level signals. These might
be reverb returns, or live midi instruments that you're running virtual
and synced along with your mix.
On any console, the job you give the fader
determines the name of that fader. If you're using it for a tape return
or for some other line level input that's not going to the multi-track
to record, then it's called a monitor fader.
If it's going to the multi-track to be recorded
it's called.........
The Channel Fader
The channel fader takes in a line or
mic level signal and sends it to the multi-track tape machine. This is
accomplished by a direct patch or by using the multi-track busses. These
will be covered in an upcoming feature. The channel fader is usually set
at zero which is called unity
gain. The reason you set it at zero and leave it there is so that you
can use the mic preamp's gain control to set your level to tape. For the
most part, anytime you have two opportunities to add gain along a signal
path you'll try and optimize all but one by running the unneeded stages
at unity gain.
The more you know about the equipment you
work with, the more you're worth as an engineer. Keep your browsers here
for more info next week on consoles and how they work.
Consoles Part 4
Last week we explored the different kinds of faders you'll find on a recording console and the jobs they do. This week we are going to discover what auxiliary sends are and how they tie into parallel effects processing and headphone mixes.
Auxiliary Sends
Auxiliaries, aux sends, echo sends, and cue sends, these are four names for the same thing. Simply put, an auxiliary send lets you send off a signal from the console, either pre or post fader, to any device that will accept a line level signal like a reverb or delay or headphone amp. All this without effecting your original signal one bit. One of the two main things you'll use an auxiliary send for, is..........
Parallel Effects Processors
The following devices fall under the category of parallel effects.
Reverb
Delay
Pitch Shifter
Flanger
Chorus
Phase Shifter
The best way to use these types of effects is to use them in a parallel fashion. To see what I mean by that, look at the drawing below:
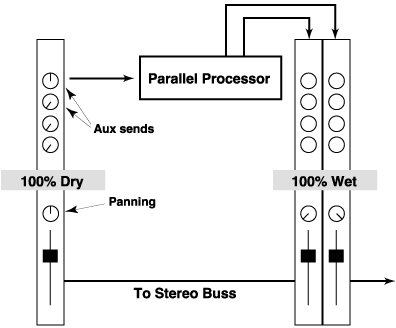
When you're effects are used in this
fashion, it optimizes them in a number of ways. Because all I/Os on the
console have aux sends, you can send any number of signals to the same
effects device. (for the BEST possible mix it's not advisable to send everything
to one reverb, more on that during our upcoming series on mixing). You
also have your original signal untouched and the treated signal coming
back in stereo on two additional I/Os. This lets you set a wet/dry relationship
that can stay this way during the whole mix. In addition you can maximize
your signal to noise ratio.
You do this by using up the headroom of the effect so you don't have to
ride the output at a hot level. This makes the output stage of the device
much quieter.
On the other hand, If you chose to hook up
a reverb in a serial fashion (like most guitar stomp boxes) you'd be at
the mercy of the device as far as noise goes. This is because your whole
signal would be traveling in and out of the device, so if the device is
noisy then so is your original signal. In addition, you wouldn't be able
to use the same device for a number of signals, but only for that one signal
you're sending through your processor.
The other thing you're going to use your auxiliary
send for is........
Headphone Mixes
A lot of the time, it's not practical to send your stereo buss mix to the band when you're tracking or overdubbing. This is because you may have special requests from the band for specific things in and out of their mix. For instance the drummer may not want drums in his phones because they are so loud in the room, or you may not want to listen to an annoying click track in the control room. So you can use the auxiliary sends to build a mix from individual I/Os just as you would with a fader. Then you'd send the aux master output to the headphone amp and you'd have an independent mix for the band. You can then change your mix in the control room and not effect the bands headphone mix.
Consoles Part 5
Pre Vs. Post
One of the options you have when setting up auxiliary sends is whether to send them before or after your fader. This is called Pre or Post and is represented by a button near the auxiliaries. It can be a button for each separate aux send or for groups of two or more. The reasons you'll set these up in either fashion are simple. Here's the basic guidlines: Headphones - Pre, Effects - Post. Let's take these one at a time.
Headphone Setup
The great thing about using auxiliary
sends for headphone mixes is that if you set them up Pre-fader, you can
have a completely independent mix going out to the studio. This means that
no amount of manipulation to your mix in the control room will change the
headphone mix. If the drummer wants no drums and all bass and guitar in
his phones then you can give it to him. You can use individual mono or
stereo pairs of auxes to send as many mixes to the studio as you have headphone
amps. Very versatile. If they're all set-up Pre-fader you've got total
independence. VIVA LA INDEPENDENCIA!! You go about building a mix from
the auxes just
like you'd do it from faders. First
you'd put on headphones with the feed that the studio is getting or choose
to listen to the auxes in the control room monitors. Then you go channel
by channel just as you would with faders, and add each mix ingredient to
the headphone mix, including reverb. It's easy to take requests and make
tweaks along the way and you don't have to change your own mix. This is
great when the band has to listen to a click track when playing. Because
they have their own mix you can give them the click and just have the instruments
etc. up in the control room.
Effects Setup
On the other hand, when you're setting up auxes to send to parallel effects processors, the smart choice is to use the auxes Post-fader. This way the effect will follow the action of your fader. For instance, let's say you've chosen a few reverbs and ambient effects for your drum kit. You set them up PRE-fader. Now you decide that you want to fade the drums early and just have the percussion take the song out in the fade. Because the effects are before your fader, when you fade the drums you'll have drum reverb still coming out into the stereo mix. Not something you'd want. If you'd of set them up Post-fader, the effects would maintain the same wet/dry relationship that you had set up in your mix and the reverb would fade with the drums.
If you keep these guidlines in mind when
setting up reverbs and headphone mixes, auxiliary sends need not be intimidating
or mysterious.
Consoles Part 6
Dateline: 10/07/97
Get on the Buss
We've established that the basic building
block of a console is called an I/O
(input/output). The input section is where you'd plug in a microphone or
line level device into the console. How you get out of either the channel
side (going to the tape machine) or monitor side (going to the speakers/2-track)
of the console is called a buss. A buss is a common signal line that carries
the signals you assign to it. You can equate it to a city bus, it's a conveyance
where you can transport one or many people (signals) to a destination.
How you assign it is by using a buss matrix, to get to the multi-track,
or by injecting individual monitor faders into the stereo
buss to get to the speakers/two-track.
The Buss Matrix
When you see the specs for a console and it says 8-buss, they are speaking of the routing capabilities of the buss matrix (also known as the multi-track buss). Each buss of the matrix corresponds directly to a track on the tape machine. If you had an 8 buss console and one ADAT, it would be perfect because you'd have a dedicated buss to each track. If you had a 4 buss console and an ADAT you'd only be capable of bussing to 4 of the 8 tracks at any one time.
A Bussing Scenario
If you had to record a drum kit with an 8 buss console, one of the ways you might route the signal is as follows:
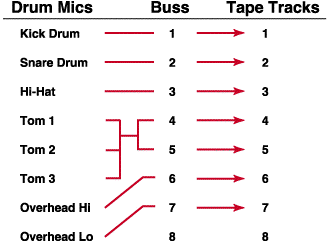
You can see that every mic but the tom
mics maintain a one to one relationship with the tape machine. To save
tracks I chose to record the three toms down to two stereo tracks. This
is the beauty and strong point of the bussing matrix. You can take any
number of signals and bounce them down to stereo or mono.
By manipulating the pan feature of the matrix
I can assign Tom 1 completely to track 4 (panned even), Tom 2 to both tracks
4 and 5 (panned center), and Tom3 to track 5 (panned odd).
This way I free up an extra track for whatever
else I'm recording at the time, bass for instance. This panning feature
is the pan on the channel fader or sometimes a dedicated buss pan up near
the matrix.
The Stereo Buss
The stereo buss is how you get the monitor faders to the speakers. The multi-track tape returns feed the monitor faders which in turn feed the stereo buss. The master volume control for the stereo buss is the Stereo buss master fader. This is the fader that you use to fade the song at the end of the mix. The stereo buss master feeds the control room speaker amp and the two-tracks. How the individual faders feed the stereo buss varies from console to console. Some manufacturers dedicate a button that injects the faders into the buss, others do it as a rule and you have to take them out of the stereo buss by pushing a button. Simply put, bussing is one of the ways to get your signal efficiently to the destination of your choice.
Consoles Part 7
Interconnection
In a large pro studio with lots of gear,
you will need to be able to connect all of it to each other at some time
or another. It's not practical to run cables all around through the studio
from here to there. So a lot of time and money is spent to build the facility
so you can run cable under the floor and through the walls. This is so
you can plug in a mic on the other side of the glass and be able to hear
it and route it to your console. All this without jumping through a bunch
of hoops to get it done. In addition, you need to be able to access the
gear in the outboard rack and the multi-track tape machines. So, for practical
reasons, all the ins and outs of all the equipment in the studio terminates
at the patch bay. This way you could make a copy of a DAT to a cassette
as easily as taking two patch cables and connecting
their inputs and outputs, even though
they may be at different ends of your rack.
It is relatively expensive but makes
your work much easier and is the way that all major studios operate. Even
in a home studio, someday you may decide that you need a patch bay....even
a small one, so here's how it all works.
The Scoop
Patchbays by nature are groups of inputs
and outputs. They are constructed into groups of two rows stacked on top
of each other. The top row being an output and the bottom row being an
input (some bays are just the opposite). Patch cables are expensive, and
so you don't have to make a lot of common patches there are connections
that are normaled. A normal is a connection that is hard wired at the back
of the patch bay so you don't have to patch it at the front. These are
ins and outs that you want to be connected all the time. For instance,
buss outputs to multi-track inputs, or multi-track outputs to monitor fader
inputs. When they are hard
wired in this fashion they are said
to be normaled. This is a flexible setup by design, you can do something
called breaking the normal by simply routing a new signal (via a patch
cable) to any input. This disconnects the normaled signal to the input
you're plugged into, and inserts the signal where you've patched from.
Two Kinds of Normals
There are two kinds of normals, they are called Full and Half normals. This has to do with how the patch behaves when you plug into an input or an output. For instance, on a half normaled patch bay, if you plug a cable in any input, you'll break the normal and be able to route your signal there. But, on a full normaled patch bay, if you plug into any input or output you break the normal.
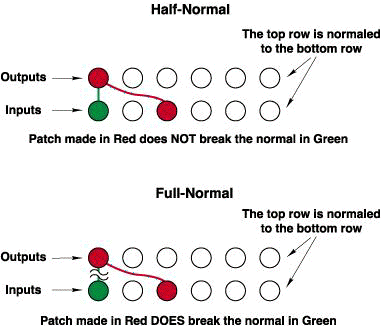
Personally, I like to work with half normaled patch bays. The reason being is that there are some situations where you want to have your signal going to two places. To be able to make that double connection happen with one patch is a good thing.
Consoles Part 8
What's a Mult?
If you're in a situation where you're
working on a patch bay that's fully normaled, and you must split your signal
to two places, then you've got a problem to solve. If you remember last
feature, when you plug a cable in any output on a fully normaled patch
bay, you lose the normaled signal. The way to overcome this is to use a
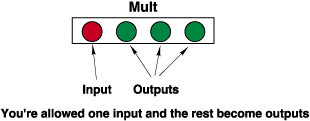
handy set of patch points called a mult. A mult is a passive splitter.
Passive meaning not powered. The way the mult is laid out is usually 3
or 4 side by side patch points. It's wired from the back in such a way
that when you plug a signal in any one of the four, the other three become
outputs. In other words there is no set input,
any of the 3 or 4 points will work as
an input and the other three become the outs. The mult is usually labeled
as below:
How to use a Mult
Let's say you need to split off your signal form one output to two inputs. Say it's tape track out 15 and you want it to go to inputs 15 and 16 on the console. Using the mult, you could take output fifteen (remember if we were using the fully normaled patch bay this would kill your normal to input 15 below), and go into the mult. Then take any two outs from the mult and go to inputs 15 and 16 on your console. The mult just solved our normaling problem.
Other Mult Uses
Most patch bays whether full or half
normaled will have a number of mults for you to use. They are handy things
to have around and I say the more the better. You could use a mult to:
Re-Cap
Remember: a mult CAN take any signal
and split it into many signals. It CANNOT take two inputs and mix them
together to one output. It's a splitter not a mixer. Mults are handy things,
if you're wiring your own patch bay, wire any leftover patch point groups
as mults.
Consoles Part 9
What are Dynamic Processors?
Dynamic processors are devices that change
the gain of your signal. For instance, that would be a compressor, limiter,
or a gate. When we talk about console dynamics we're talking about a console
coming loaded with these devices on the individual channels and perhaps
the stereo buss as well. It used to be you had to spend big dollars to
get this option. Traditionally SSL and Neve "V" series consoles have a
dynamics section built in as standard equipment. These consoles sell in
the hundreds of thousands of dollars range. In recent years consoles in
the $25,000 and up price range have begun to offer dynamics as a feature.
The AMEK BIG
for instance comes with Virtual Dynamics.
This is a software based limiter, compressor, gate or panner that is available
on the first 24 channels and is a great leap in technology for this price
range.
How Do They Work?
In a previous feature we discussed parallel effects processors and how they work, dynamic processors work as serial devices. This means instead of a piece of your signal going off and being processed then coming back separately, your whole signal goes through the device in a serial fashion and comes out altered.
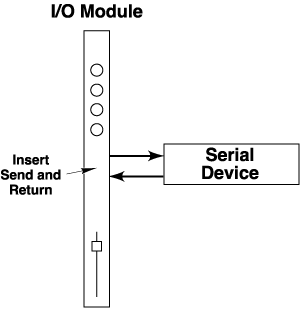
So, unlike parallel processors, if you lose the connection to your serial device you lose your signal altogether.
Why Use a Compressor?
There are two reasons you'd want to use a compressor on different mix ingredients. You'd want to limit the dynamic range of something to be able to give it more prominence in the mix or to even out an uneven performance. This allows you to lower the overall gain and yet hear the entire performance, thus bringing up the apparent loudness of the signal. You'd want to pick and choose what you want to compress based on the performance, musical style and what kind of sound you're going for. Compressors can be overdone so use them sparingly to maintain an open and transparent feel to the track. Also just because you have compressors on every channel of a console doesn't mean that you'd use this same type of compressor on all the things needing it. Use outboard compressors for the important items like bass and lead vocals.
Why Use a Gate?
To clean up those spots in between parts
of a performance where tape noise and other spillover sounds like headphone
leakage resides, you'd want to use a gate. This will tend to open up a
track by cleaning up all these unwanted lurking sounds. I use gates on
mix items where there are holes or spaces in the performance. On kick and
snare drums especially. Something that is constantly playing does not need
a gate because there are no holes to clean up.
So when you see a console ad that talks
about dynamics as an option, you know they're talking about serial devices,
specifically gates and compressors. Next week we'll discover more about
dynamics processors including specific setup scenarios.
Consoles Part 10
The Starting Line
Just like you do certain things to setup your car when you start it, (seatbelt on, car in park or neutral if it's a stick etc.) there is a basic starting point that you can use when setting up compressors and gates. This makes it much easier to get the device to do what you want it to do right off the bat. If your device has been used in a previous session and is already setup for something different than the instrument you're going to use it on, it can be a challenge to get it going. Not that I'm not one for challenges, but if you can start out the device fresh your job will be easier. The idea is to use the following setups as a starting point and then tweak your signal until you get exactly what you want.
Compressors
Quite simply the routine for setting up a compressor is as follows:

Threshold at
zero
Ratio at 2:1
Output at zero
I'm purposefully using a very simple compressor such as the DBX-160X as a template here. Other compressors may have more features but if you can start out with this one and can master the basic parameters then you can easily jump to something more complex using the same principles. Before we run through what each parameter does let's explore compressors for a second. How compressors work is that all audio below the threshold is untouched and all audio above the threshold is compressed according to the ratio. The ratio works like this: 2:1 would mean that for every 2dB over the threshold you'd get 1dB back, this is called gain reduction. If you flip 2:1 over you get 1/2, this means you'd get half your level back of the signal over the threshold. 3:1, 4:1 etc all work the same, you're just getting less back compared to what you put in. Various compressors sound harsh or transparent based on the attack and release settings. If you don't have attack and release settings these parameters are said to be fixed.
Gates
Gates work by opening up and letting audio pass when the threshold is crossed and closing when the signal falls below the threshold. Basic gate setup is as follows:

Threshold at
zero
Attack at the
quickest setting (usually turned left)
Hold at the
quickest setting (usually turned left)
Release at
the quickest setting (usually turned left)
Range set to
the lowest possible dB for maximum gating
Threshold of course is where your gate
opens up, Attack is how fast it opens, Hold is how long it stays open after
the attack, Release is how it tails off (gradual or quickly) and range
is how low in level the gated signal will be heard.
Consoles Part 11
Why Use EQ?
EQ should be your last line of defense
when recording. Microphone positioning is a better solution to frequency
problems. For instance, next time you're recording an acoustic guitar,
put your head in and around where the player is and notice how the sound
changes. Up near the neck you get more of the string sounds and it's a
bit thinner. As you travel down near the sound-hole it gets fuller and
at the tail of the guitar, high frequency falls off and you get more lows.
Where your mic is placed will determine how it sounds in the control room.
Also keep in mind that you're listening in stereo, if you put one mic up
and expect it to sound like it did when you
were in the room with the player you'll
be disappointed. Even when you're going to one track of the multi-track,
put up two mics and buss them both to one track. This gives you the benefits
of stereo miking even when you can't afford to lay it down that way.
There are times however that EQ is your only way to shape your sound and add the ingredients necessary to have it come out
1...2...3 Types of EQ
Although there are other kinds, the following three types of EQ are the most common that you'll encounter at the console. Each number below also represents the amount of controls you'll have to adjust.
One
This type is called Tone Control. You get one control, boost and cut of a fixed frequency. You'll see this type of EQ every day when you get in your car. Bass and treble control on your car radio is a basic tone control. These are most likely factory-set at 10k at the top and 100hZ at the bottom.
Two
This kind is called Sweepable EQ. You get two controls, boost and cut and a frequency sweep control. The sweep varies, sometime it covers a small area but mostly you'll find that manufacturers cover a large piece of tonal real-estate, especially in lower priced consoles. Common labeling might be 4k to 18k at the top and .5 (meaning 50hZ) up to 8k in the bottom band. By the way, when you hear the term "bands" of EQ, that is referring to how many different volume/sweep control combinations you get on a console. For instance a four-band EQ would cover lows, low-mids, high-mids and high frequency, all separately.
Three
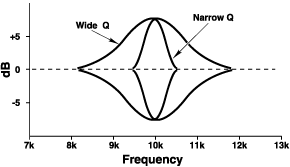
This is called Parametric EQ. You get three controls, boost and cut, frequency sweep, and "Q" control. "Q" stands for bandwidth, it refers to how big of a piece of frequency real-estate you're affecting when you boost or cut. These are called wide or narrow "Q" (narrow is sometimes called high "Q"). What the "Q" determines is how many frequencies around your target frequency you're affecting. The drawing below illustrates what I'm talking about:
Summary
These three types are basic. Some manufacturers
might give you an either or "Q" control on a sweepable EQ. This would be
called semi-parametric because you only have narrow or wide options and
not a sweepable "Q".
Consoles Part 12
Shelving EQ
One option you'll often find on the upper
and lower band of a console's EQ section is the ability to shelve the EQ.
Shelving refers to the ability to boost or cut a certain frequency and
then all the frequencies beyond that, either at the top or bottom of the
spectrum. (see the illustration below) Shelving is a switchable option
and not the norm for most EQs. Most types of EQ, as a default, let you
boost and cut at a wide "Q". This uses the bell shape that you saw in the
artwork of last week's feature. Overall, it's the smoothest way to boost
or cut. Instead of using a wide "Q" you may want to create some "air" in
certain mix ingredients. The term air describes an overall high frequency
sheen that shelving creates. This is very useful for lead vocals and perhaps
a solo instrument that you want to give a special
quality to. Overused it makes your mix
top-heavy. Used wisely it gives focus to important mix ingredients like
drum overheads, certain percussion and vocals.
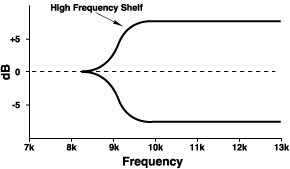
If you cut the low frequencies of certain
mix ingredients you eliminate unwanted low frequency clutter in a mix.
For instance, let's say you have a home studio that's not completely isolated
from outside noise and you live near the freeway (I actually worked in
such a place). Every time you record vocals or anything using a microphone
you'll get a lot of rumble and low frequency hash on tape. This is further
accentuated by using a digital multi-track because of the low noise floor.
Because these machines are so clean it leaves that low frequency hash more
exposed. By shelving out the low end where it's not needed, say on lead
and background vocals you clean up the problem. For instance, you wouldn't
shelve 50hZ out of a kick drum or bass track but on a vocal or sax solo
it would be fine. You're not using that part of the spectrum anyway. I
assisted for one famous engineer who as a rule would go through and shelve
out the low frequency on any
track where he wasn't using it. Not
a bad practice especially in today's digital world.
Parametric vs Semi-parametric
One other distinction that I want to
mention here is parametric vs semi-parametric EQs. The "Q" control option
of a fully parametric EQ allows you to adjust the bandwidth. Sometimes
to save money a manufacturer will give you an either/or bandwidth control.
You can either choose wide "Q" or narrow "Q". This is done with a button
or incorporated into a push/pull frequency sweep knob. This is called semi-parametric
because of the either/or nature of it as opposed to a true sweepable "Q"
you'd find in a fully parametric EQ.
Consoles Part 13
The Monitor Panel
You get three basic controls on the Monitor panel.
Speaker choice
- If the control room has multiple speakers then you
get to choose
which pair you're listening to.
Speaker Volume
Choice of source
- You get to pick exactly what you're listening to.
Stereo buss,
DAT machine, cassette machine, CD player etc..
In addition some consoles will allow you to control what you're sending to the speakers in the studio (if any) and at what volume. So you could be listening to the stereo buss in the control room and sending a CD out to the speakers in the studio independently. The monitor panel resides up and away from the faders usually, sometimes near the stereo buss fader. The monitor panel is one of the first things you should look for when you're working on a new console. It's something you'll come back to time and time again.
Inserts
We talked about serial devices and how you put your signal completely through them. Most consoles have an insert point so that you can patch a serial device across the signal. It's usually a patch point labeled Insert Send and Insert Receive. You'd take the insert send and patch it to the serial devices input and take the output of the serial device and return it to the insert return on the patch bay and the connection would be made. There is sometimes a button that lets you bypass the insert so you can A-B the device to see if you like what it's doing to the sound of your signal. Another button also lets you route the insert pre- or post-EQ and choose whether it's going across the channel path (to tape) or the monitor path (to speakers/2-track).
More Than One Way to Insert
Since an insert is just a console output
and an input at line level, there are a few more places on the patch bay
where you can patch serial devices as well. For instance the Buss or Direct
Output and Multi-track input could be an insert. This would route your
device after the console and before the multi-track. Also the Multi-track
output and the Console Line input could be another place you could patch
a device through. This would be after the tape machine and before the console.
There's more than one option when patching a serial device.
Consoles Part 14
What is a Mic PreAmp?
The first thing a microphone sees when
it enters the console is the mic preamp. The reason you need a mic pre
is to boost the microphone's signal from mic level to line level. Line
level is the language that the console, tape machines and all the outboard
gear in the studio speaks. Once you've boosted the mic to line level you
can send it's signal throughout the control room to interface with any
line level device.
The mic preamp is your master volume
control to set level to the multi-track tape machine. Even though your
signal passes through a number of other gain stages such as the channel
fader and multi-track buss trim, you still want to use the mic pre to set
your level to tape.
If you're using a Direct Box to record
bass or guitar, you must plug the output of the DI (direct box) into a
mic preamp. This is because the output of the DI is at mic level. A bass
or guitar, just as a microphone, can't speak the language of the studio
without being translated. A guitar's output is unbalanced
and high impedance. The input of the console wants to see a low impedance,
balanced signal. The DI translates the signal to low impedance, balanced
mic level signal so you can plug it right into the console's mic preamp.
There's a rhyme you can use to remember the hi and lo impedance puzzle.
Hi into Lo won't go, Lo into Hi will fly.
This simply means that Hi impedance into Lo impedance doesn't work but
Lo impedance into Hi impedance will.
Padding the Input
A mic pre sometimes comes with a pad.
This is a button that resides near the mic preamp. It's simply a one-shot
volume reduction control. If you engage the pad, it reduces the input volume
BEFORE the mic pre by a pre-determined amount, usually -10dB. This is used
if the input from the mic is so hot that you're overloading the mic pre
and causing distortion. If you use the pad you can lower the volume and
gain back some headroom
in the console.
Some condenser mics come with a pad.
This is a switch on the mic that says 0 in one position and -10 in the
other. This pad is usually before the mics amplification stage. If you're
overloading the mic's internal amp then you can pad the signal so it's
clean coming out of the mic. This signal may still be too strong for the
mic preamp meaning you'll have to pad it again at the console. Kick and
snare drums are notorious for having the kinds of level that will overload
microphones and consoles. If you're hearing distortion when you're recording
instruments with high transients,
pad them either at the console or the microphone and you should hear them
improve immediately.
Consoles Part 15
The Plan
The reason we're putting it all together
this way is so that you can assess any console for features and figure
out how to use it more quickly. I call it Selective Amnesia. This is knowing
what parts of a system you can forget (for the time being) in order to
use it now for one specific purpose. How you get there is to know what
questions to ask and what your goal is. In this case the goal is to get
a microphone onto tape and monitor it. Also send a headphone mix and add
reverb to selected signals. Is that too much to ask? HECK NO!
I'm used to going to different studios
and having to quickly jump between different consoles, automated and not.
So I thought this would be a good way to get your head into understanding
signal flow and functions to the point where you can feel more comfortable
on your own console and others. Here goes:
The Acronym
If you can remember two simple names
you can put the whole console series together easily. I've linked the letters
to the corresponding features.
So if you want to jump back and forth
it's easy. The names are FABIO and DEMI. Yes as silly as it sounds. These
two names contain all you need to know about consoles. Check it out.
F
- Faders
Three kinds of faders on most consoles,
Channel, Monitor and Stereo Buss.
A
- Auxiliaries
Auxes are used for headphone mixes and
to send to parallel effects devices.
B
- Busses
Two kinds of busses, Multi-track buss
and Stereo buss.
I/O
Input/Output
This is referring to the Grand Central
Station of the control room, the patch bay.
D
- Dynamics
Some consoles have a dynamics section,
meaning gates and compressors on every channel.
E
- EQ
Three types of EQ are discussed in this
feature.
M
- Monitor panel and Mic
Preamps
Here's where you control what you're
listening to and the mic level to tape.
I
- Insert
An insert is used to patch a serial
device. There's more than one way to do it too.
So there you have it. The entire 14 part
series all in one memorable index.
Next time you're around a strange console,
use FABIO/DEMI on it and
see if you can find all the parts and
identify them.