Microphone Primer
Dateline: 03/18/97
A microphone is a transducer. It changes
one kind of energy into another. The human body has two transducers for
instance, the ears and the voice box. What you need to know about microphones
can be broken down into the following word: TRAP. Each letter of "trap"
stands for a mic attribute or a fact that you should know about mics in
general.
T -- Type - Studio mics break down into
two basic types. Dynamic and Condenser.
Dynamic mics work on the principle of magnetic
induction. They need no external power to run and are very simple to make
and relatively cheap to buy. Dynamic mics come in two varieties: Moving
coil and Ribbon. Moving coil mics use a magnet, a coil wrapped with wire
and a diaphragm that sits over the top of both. Sound pressure hits the
diaphragm and moves the coil across the magnet. This creates the voltage
that travels out and along the mic cable on the way to the mic pre-amp.
A ribbon mic is a bit different. Instead of a coil and diaphragm, a thin
metal corrugated ribbon is stretched across the magnetic field. Sound pressure
hits the ribbon and moves it across the magnet. Both these mics have their
own particular characteristics dealing with frequency and transient responses.
Condenser mics are generally more expensive
and have a flatter frequency response than dynamic mics. They also operate
in an entirely different fashion. For one thing, these mics need power
to run. This is supplied by phantom power, +48Vdc. This comes from the
console or from a battery or power pack. When phantom power comes from
the console, it's sent right down the mic cable from the console to the
mic. The phantom power charges a capacitor which holds a charge in the
mics fixed back plate. In front of the back plate resides a thin diaphragm.
When the diaphragm moves in relation to the fixed backplate, a charge is
developed in relation to how much movement the diaphragm does. Unlike the
signal created by the dynamic mic, this signal is very weak and must be
amplified before it gets to the console. In order to do this the mic contains
an amplifier that boosts the signal before it leaves the mic.
R-- Recognition - This is simply what
mic is named what? To run a session successfully in a studio environment
that may have an extensive collection, you need to know your tools. Just
as a plumber or a carpenter could tell you what their tools are. This is
a matter of studying mics in general. Asking questions and doing a lot
of reading on the subject. Watch this page for regularly featured mics,
this will include line art and other info.
A -- Application - What mic is good for
what job? Do you know the best mic for recording kick drum? How about vocals
or horns? Keep your eye here for recording tips and other great info.
P -- Patterns - The directional response of
a mic has to do with how the mic picks up sound around it's polar axis.
A mic has a front which is called on-axis, all other directions into the
mic are called off-axis. When you talk about the on-axis and off-axis response,
you are talking about how a mic picks up sound in reference to those directions.
There are five basic polar patterns that mics offer. Omni, Cardioid, Hyper-cardioid,
Super-cardioid and Figure eight. Watch this page for further explanations
on these patterns and how they'll effect what you're recording.
Directional Response of Microphones
Dateline: 03/25/97
Every mic, by design, has a pattern in
which it picks up sound. This is called the mics directional response.
This response is represented in one dimension as a polar pattern diagram.
However, in actuality the mic picks up sound in 360 degrees. There are
five basic patterns that we will discuss here, some common and some not
so common.
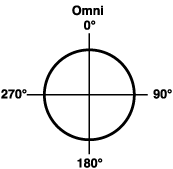
One of the most common patterns is Omni. Think
of this like a giant beach ball with the mic placed at the center. The
mic picks up sound in a 360 degree arc. As you can see in the drawing,
0° (on-axis) and 180°,270°,and 90° (off-axis) pick up sound
equally. When placed properly in pairs, mics with this pattern present
a very real representation of stereo. Other patterns in pairs represent
sometimes negative characteristics involving phase and what's called proximity
effect, omnis do not (phase and other waveform properties will be discussed
in an upcoming feature).
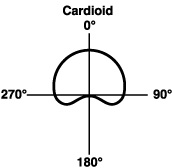
The next pattern is called cardioid. You can
see where it got it's name because it looks the shape of a heart. The drawing
shows that on-axis response is full and as you come around the side to
the back of the mic, it tapers off to zero. This pattern is said to be
uni-directional or directional. This works great when you have a situation
where you want the off axis signal to be diminished. For instance, when
you're miking a snare drum or toms on a drum kit you'd want to downplay
the off-axis signal which would be the cymbals, hi-hat etc.
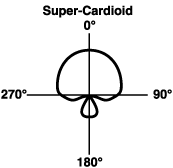
Cardioid now slowly morphs into bi-directional
with two stops along the way. Super-cardioid, as you can see, is very much
like cardioid with a few changes. The front lobe starts becoming more directional.
In other words it shrinks at the sides. This pattern also starts developing
a small back lobe so it is letting in a little bit of sound off-axis.
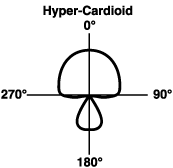
Hyper-cardioid is the above and more so. The
front lobe becomes even more directional and you can see that the back
lobe is even more pronounced. This pattern would be good for a situation
where you want the mic to be more directional and also want to pick up
more of the environment that you're recording in. For instance, when recording
a choir in a nice concert hall you could "aim" the mics at the choir and
also get some of the nice off-axis signal that would bring in the sound
of the room. Super- and Hyper-cardioid have limited use.
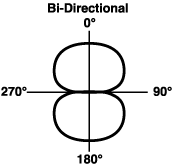
Last stop is bi-directional or figure 8 pattern.
This pattern picks up equally well on- and off-axis and cancels at 90°
and 270°. You could, for instance have two vocalists, one at either
axis and pick them both up equally well. Don't confuse this pattern with
a stereo mic. The signal still comes out of the mic in mono, you're just
able to pick up the sound in a figure 8 pattern. Bi-directional is also
limited in it's usage, 90% percent of the time omni and cardioid will be
your patterns of choice.
Frequency Response of Microphones
Dateline: 04/01/97
The frequency response of a mic can tell
you a lot about it and how to use it. In general, a frequency response
chart tells you what a microphone puts out as opposed to what it gets in.
In other words how true it is to the original sound that it's presented
with.
Microphones are tested in an anechoic
chamber. This is a specially constructed room just for audio testing. The
room is completely dead, without any sound reflection. A speaker is set
up in front of the mic that is being tested and pink noise is played (pink
noise is essentially all frequencies with even energy in every octave).
The mic cable is routed into a spectrum analyzer that measures the output
of the mic. A frequency response chart is produced from this, usually over
the 20 Hz to 20,000 KHz range which is the range of human hearing. Like
any manufacturing process, no two mics are exactly the same, you can even
get an occasional
lemon. This chart helps the manufacturer
keep quality control high and can let them match two mics for sale as a
pair. As audio pro's we can look at the frequency response chart and get
a ballpark estimate as to what the mic's all about. In a perfect world,
a flat frequency response is the golden mean. In other words if the mic
is putting out exactly what it gets in, then that's great! However, this
world isn't perfect last time I checked, and all mics have some kind of
variance from the zero line. This shows up as dips and peaks on the frequency
response chart. These peaks (called bumps) and valleys are not spikes but
gradual rises and falls. Condenser mics usually stray little from the zero
line. Whereas dynamic mics can look like a mountain range .
The Real Difference
A lot of factors determine what makes
up a microphone's frequency response, for the most part you can think of
condensers as being more true to life than dynamics. This also accounts
for the great price difference in the two mics. You can get a brand new
dynamic for under $100, whereas a decent condenser starts at around $400
and then the sky's the limit. For instance, a refurbished U-47 tube mic
can be as much as $7,000! Does this mean that a dynamic is not desirable
at all? No way! There are many applications where you'd prefer to use a
dynamic mic. For instance, dynamics can take more level in general and
great for use in high SPL
(sound pressure level) situations. Close
miking of drums for instance.
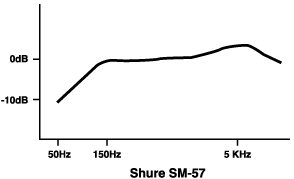
Let's take a workhorse mic like the Shure
SM-57 and use it as an example. Look at the frequency response chart (this
is a re-draw and not from the manufacturer so it's not gospel, just meant
to be an estimation). You can see that at 50Hz the mic is down -10dB. It
then gradually rises to zero level at about 150Hz. After that it's flat
until you get to the 4KHz to 6KHz where you have a bump that rises and
settles down and then the mic drops off at the high end. Definitely not
a true representation of what's going on in the real world. However, this
is a good thing! First off, this mic has a cardioid directional response.
(See the polar patterns explained in previous
features.) This means that the mic would be directional and would cancel
from the back. In addition the mic is built like a rock and is cheap to
buy. Looking better all the time. The
frequency response makes it especially good for snare drum. The fundamental
frequency of the snare resides in the 150Hz to 250Hz range, right where
the mic is flat. The presence bump at 5KHz is just where the snap of the
snare resides. In addition it's rolled off low end makes it great for de-accentuating
the kick drum which is very close in proximity, and the cardioid pattern
makes it naturally reject the off-axis hi-hat, cymbals and toms. A match
made in heaven! That's why this mic has been around for a long time and
will continue to be so. At the other end, this mic would be a bad choice
for miking a kick drum because of the lack of low frequency return.
A mic's frequency response chart can
tell you a lot about where to use or not use a mic. We will refer to this
in upcoming features and mic reviews.
Transient Response of Microphones
Dateline: 04/08/97
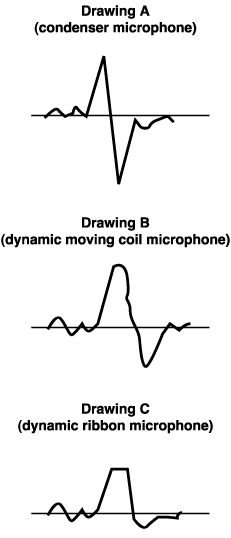
A transient is a short duration, high
level peak, such as a hand-clap or snare drum hit. How a microphone reacts
to a transient will directly effect its frequency response and how much
SPL (sound pressure level) it can take. The transient response of a condenser
mic, for instance, is quite accurate and quick. The design of the mic makes
it very sensitive and mostly flat across a broad range of frequencies (depending
on the mic of course). The diaphragm is able to snap back to a neutral
position quickly and thus is ready to be hit by a new wave and react to
it accurately. This is called the impulse response time. You can see in
drawing A that the transient response of a condenser mic gives you the
full peak and the valley on the positive and negative side of the center
line. Because of this accurate representation of the positive and negative
transient, a condenser mic's headroom is quickly used up. There is a price
paid for a mic that gives back most of what it gets in. The price is that
it can't take a lot of SPL. On the other hand if you look at drawing B,
you see that the dynamic mics response is a bit different. It doesn't give
you the full positive or negative wave. The wave is a bit clipped off at
the top and bottom. Thus the headroom is not used up as quickly and as
a general rule, dynamic mics can take more level than condensers. The third
drawing, drawing C, shows you the transient response of a ribbon mic. This
mic gives back even less
than a moving coil dynamic microphone.
You can see that the positive wave has a crew-cut and the bottom or negative
part of the wave is almost non-existent. This is because ribbon mics use
a thin corrugated piece of metal rather than a diaphragm and a coil. The
ribbon is very thin and is only anchored at top and bottom. When a wave
hits it, the ribbon goes through a lot of motion before it comes to rest.
This gives ribbons their characteristic rounded off or smoothed out sound.
Ribbons have made a recent comeback since Steve Albini used a Coles 4038
for recording the guitars on the multi-platinum effort he produced with
Nirvana. The guitar
sound is smooth, yet cutting and sounds
great.
One exception to the idea that condensers
can't take as much level as a dynamic mic is the Earthworks line of fixed
omni condenser mics. These mics use an extremely small diaphragm. This
results in an extremely quick impulse response time and an extended frequency
response that is mostly flat up to 40k. They can also take almost nuclear
sound pressure levels. I'll be doing a mic overview soon so keep your eye
here for a lot of info on individual mics including the Earthworks TC30k
and TC40k.
Microphones Part 1
Dateline: 05/13/97
Our first feature (see
3/18/97) focused on mic basics. In subsequent weeks we've explored
the physics of sound. Now
we can start to dig into the best way to capture it. Each week for the
next few weeks we'll be focusing on a general miking topic. You'll also
be seeing overview of mics I've reviewed or had experience with. In addition
we'll be looking at three microphones that Equitek has sent me specifically
to review for this site.
There's lots happening here and I'm
excited about it!
Stereo Miking Techniques
Last feature we talked about the 3-to-1
rule. This week we'll explore ORTF, spaced omni's and the x-y techniques
of mic placement. A major consideration when miking in stereo is phase
coherence (see 04/29/97).
This means capturing the sound wave in the same part of the cycle in both
microphones. There are specific miking techniques that will help you with
this, one being the 3-to-1 technique. Another is called ORTF. This is an
acronym for a French phrase that escapes me now, but the technique is this.
Place the mics 17cm apart and angled at 110 degrees. If you do this with
your fingers you'll see that it's supposed to simulate your head and
how our ears are situated. Not a bad
scheme to steal from mother nature! There are manufactured attachments
that can sit right on a mic stand that will let you attach mics exactly
in this configuration. This technique works best with non-omni patterned
mics. Omnis present their own specific problems that must be dealt with
differently. Also, ORTF is best suited for small capsule mics. Large capsule
condenser's off axis response is poor because of the capsule geometry.
Because of this, if you use them in ORTF the undesirable off axis is pointing
right at the center of what you're recording. Both of these mics are best
placed with the technique in the next paragraph. Also remember that contrary
to what common sense might tell you, when using ORTF, the greater the angle
the smaller the stereo image. Turning the mics out exposes more of the
sound source to the off axis side of the mic. This shrinks and weakens
your stereo image. Not spreading them as widely puts the source more on
axis to both mics.
Omni patterned and large condenser mics
work best when placed in spaced pairs. How far apart you space the pairs
depends on what you're recording. Omni overheads on a drum kit, for instance,
could be 3 to 4 feet apart. A large choir might take a 6 to 10 foot spacing.
The best thing to do is to experiment a bit and listen to what you're getting.
Our last pattern this week is called
x-y. This is simulating the x-y axes on a graph. The capsules of the mics
are placed in very close proximity and pointed at or around a 90 degree
angle. This placement eliminates phase problems because the wave hits both
mikes at the same time. This placement will not work with omni mics. Think
of the omni pattern as two huge beach balls with the capsule of the mics
at the center. If you put the two balls together it just makes one big
ball and you no longer have stereo. Following the ideas and techniques
in this weeks feature can help you capture the best of what goes on in
any recording situation.
I want to thank any and all who have
visited my page. I just got the numbers for the first week and there are
over 500 hits. Keep it coming and keep the feedback coming too. I'm going
to Los Angeles this week to work at Mad Hatter recording studios. I'm tracking
a jazz album and will have tales to tell of my experiences I'm sure. Keep
your eyes here and stay healthy.
Microphones Part 2
Dateline: 05/20/97
Assignment: Cut 14 songs for a CD. This
includes recording bass and drums and then overdubbing sax afterwards.
All this had to be accomplished over a span of one and a half days.
We had the studio locked out from 6pm
on Monday until 10pm the following evening. So needless to say time was
tight and we had to work fast. We worked at Mad Hatter in Los Angeles.
I can't say enough about how great the studio was. Great equipment, staff
and facilities. The console was a beautiful Neve 8078 with GML automation.
They treated us like kings from beginning to end. Mark the studio manager
went out of his way to accommodate us and Darren my assistant was top notch.
We also got a killer rate as there seems to be a price war going on in
LA.
I had some special problems to deal with
in pre-production for this project. The basic layout of the group was to
be piano, bass and drums. The problem was that the piano player had been
involved in a car accident and had injured his hands. He couldn't play
for more than an hour at a time. So he recorded his performances on a midi
piano into a sequencer. Then we recorded the performances onto 2 inch analog
using a Yamaha Disklavier piano. Along with this I put down two different
kinds of click so that the other players would have a choice. All this
was done prior to our tracking date. We brought 5 reels of 2 inch along
with us to the studio.
What Mics to Use?
Now onto the microphone choices for the
session. Basically it was mikes for drums. The bass was taken direct using
a Neve 1073 mic preamp, then to an LA-2A compressor and then straight to
tape. It was a 6 piece drum kit with two snares, one was a piccolo. Kick
drum I used a D-112, both snares got SM-57s, toms I used 414s, hi-hat a
Shoeps and the overheads were two C-12s in a cardioid pattern, placed as
a spaced pair. I took all the mics through the board except the overheads
I used a couple of the 1073s that were available. Later for the sax I used
a Neumman U-67 through a 1073 straight to tape. This combination of mics
and mic preamps produced some of the best tracks that I've ever cut. This
is an ongoing project that I'll be writing about in future features.
Overview
So to re-cap the miking scenario. I close
miked all the drums except for the overheads. The toms and snares were
miked at an angle about 2 inches off the surface of the drum. The kick
mic was about six inches back from the beater head on the inside of the
drum. The overheads were spaced about 4 feet apart and were about 2-3 feet
off the tops of the cymbals. The hi-hat was angled and was pointed at the
drummer from the outside. The sax mike's position varied as to the horn
used. Soprano was between the bell and the lower third of the horn about
a foot back. Tenor and alto was pointed back a foot and just above the
bell but not facing directly into it. This is because the sound of the
sax doesn't really come from the bell but from the keys as well. So it's
kind of a general coverage scenario.
Microphones Part 3
Dateline: 05/27/97
Thanks to the efforts of my good and
long time buddy Bill Mitchell, I was sent three mics from the CAD company.
You might know this company as Equitek. I was sent the E-100 ($469), E-200
($750) and the E300 ($1,000) mics. These are suggested retail prices but
I was able to find the mics for well below that.
I write product reviews for Recording
and Pro Audio Review magazine so I did my usual shoot-out procedure when
I checked out these mics last week. I used the facilities of the Conservatory
of Recording Arts & Sciences in Tempe Arizona, where I'm on staff.
They have a nice room, Genelec and Tannoy monitors and a nice array of
Class A discrete mic preamps from API, Neve (1073s), and Calrec. They have
a Neotek board but I only used that for listening. The signal path was
microphone, outboard mic pre and then line input to the fader. I listened
on Genelec near field monitors.
IN THIS CORNER.....
The E-100 is an electret condenser, fixed
super-cardioid pattern mic. It's rated to take a blistering 148dB SPL.
the controls on the front include a 20dB pad, mic power on and off and
a hi-pass filter that rolls off below 80dB. The E-200 is a large diaphragm
variable pattern (figure 8, cardioid, and omni) electret condenser with
the same controls as the 100 plus pattern switching. The E-300 is similar
to the 200 in design except it's a true condenser. It has a gold-sputtered
diaphragm, high output and can take high SPL as well. The same controls
as on the 200 are here as well. All three mics have a battery reservoir
that guards against current limiting when the mic sees enough SPL to deplete
the 48V from the console. There is also an automatic battery shutoff switch
that disables the battery whenever external phantom is not on. The 200
and 300 also come with a swivel mount.
For the test the mics were set up in
the following fashion. E-100 through a Calrec mic pre, the E-200 and E-300
were through Neve mic preamps. All switchable mics were in cardioid pattern,
flat with no pad. All mics were charged a full 24 hours before use. I also
had a Neumann U-87 set up and through the other Calrec mic pre just as
a reference.
Comparitive Testing
The first test was a series of wooden
flutes through the mikes one at a time. This was a quality flute that had
great tone. The E-100 was unremarkable, it seemed that our contenders were
the 200 and 300. The 200 was very warm and rendered the flute most like
the 87. To me the 87 sounded a bit better but you must realize that there
is a $1,000 price difference. The 300 rendered a lot more overtones which
didn't surprise me because there is a nice bump in the 10k range. However
the 300s bump was very bright and the opinion in the room was that the
200 sounded best.
Next our vocalist Donna sang various
tunes as we had her shift from mic to mic. Once again the 100 was unremarkable
(not a vocal mic) and the contenders were the 200 and 300. For female vocals
I still liked the 200, the 300 was still very unnatural sounding in the
upper range. Next we tried two male vocalists and the opinion was the same.
Everyone liked the 200. Once again it was hanging in with the Neumann as
far as being a close contender.
Next in line was acoustic guitar. The
clear winner here was the 300. Everyone loved the upper harmonics that
it rendered and it really made the acoustic sing. The 200 was good also
but would have needed to be trimmed a bit in the low end and boosted in
the high end. Typical EQ for acoustic guitar.
The E-100 on Kick Drum
Not wanting the 100 to feel like an orphan.
We set up a test specifically for that mic. I'd heard from several students
that the 100 was being touted as a great mic for kick drum. There are very
few condensers that have adequate padding to let you get away with using
it for kick drum. The Neumann U-47 FET comes to mind, it has an input and
an output pad of -6db each. The 100 has a -20 db pad that was more than
enough to let this mic be put 4 inches from the inside of the beater head
in a kick drum. Next to the 100 we put an AKG D-112 dynamic mic. These
two were then routed through the Calrec mic preamps so I'd have some clean
EQ
available before we got to the console.
The E-100 was VERY good. It far outclassed the D-112, with or without EQ.
The D-112 had a noticeable point that the 100 lacked. But the point made
the D-112 sound a bit unnatural and it lacked the roundness at the bottom
end that the 100 had. When I added a bit of EQ (+4db at 53 Hz and a bit
at 10k) the 100 was THUMPIN! It was really very nice and the students were
asking if it was going to be around for their projects.
Recap
All in all I really liked the CAD line
of mics. My overall favorite was the E-200. It sounded the most natural
in a number of situations. The E-100 was unimpressive except when it got
to the kick drum. I'd have one of these JUST for kick. It really sounds
great. The 300 was a bit disappointing. I personally don't like a mike
that is overly bright at the top end. Especially when recording in the
now common Mackie to ADAT scenario. I like to be able to have a mic sound
like my head is in the room and then make my own EQ decisions. I was hoping
that it would have been far and away the best sounding of all the mics
but it wasn't. These mics are priced reasonably for the most part and worth
checking out depending on your needs.
Thanks to my support group of students
from the Conservatory, Tate
Eskew, Donna Gay, Nathan Hocking, Adam
Olmsted, Robin Pantall and,
David Schwartz.
Microphones Part 4
Dateline: 06/03/97
So many instruments, so many mics, so
many possible ways to set up a mic. This need not overwhelm you. Using
some simple rules like
3-to-1
and x/y technique
you can cover a majority of the instruments on the planet. One thing you
should look for or know about is an instrument's sweet spot. That is the
area best suited for picking up the best possible sound. A lot of this
is common sense. For instance, an acoustic guitar's sweet spot is NOT directly
in front of the sound hole. That is where the instrument is most boomy
and doesn't lend itself to great recording. In the next few features we
are going to cover very specific techniques for specific instruments.
Right out of the starting gate you should
ask yourself if you're going to want to record the instrument in mono or
stereo. Some instruments lend themselves to this and some don't. Things
you'll possibly want to record in stereo are: acoustic piano, acoustic
guitar (works great in mono too), some percussion (congas, bongos, misc.
toys), background vocals (either by miking a large ensemble in stereo or
by panning of individual passes), and drum kits (utilizing overhead mics
and panning of individual drums). Things you won't want in stereo are:
lead vocals, solo horns and woodwinds, bass guitar and individual percussion
(shaker, tambourine etc.). If mono is your choice then mic placement is
a simple matter of what is the best spot and distance to pick up this instrument.
Below is a short description of a number of instruments and the best area
and distance to pickup the best sound. These are guidelines and things
that have worked for me. I don't have all the answers and there are other
solutions.
Mono Instrument Miking Technique
Acoustic guitar - 4 to 6 inches in front
of the instrument, mike placed between the sound hole and the bottom of
the neck.
Trumpet - 4 to 6 feet from the bell in
front of the horn. This works well with multiple trumpets. It allows the
players themselves to get a blend and play as an ensemble.
Saxophone - The sound of the sax does
not come solely from the bell but from the keys and the bell. For tenor
and alto place the mic 4 to 6 inches above the bell pointing at the top
of the upper ring of the bell and the keys at about a 40 degree angle.
For soprano the mic should be at a slight angle and pointing at a combination
of the bell and the keys.
Percussion - Tambourine should be miked
4 to 6 feet back depending on the sound of the room. What you're trying
to go for is an ambient sound that gives you some of the room. Individual
percussion like shakers and triangles can be miked a few feet back from
the player.
Speakers - Miking speakers is easy if
you remember one thing. For close miking of a speaker the placement is
crucial in getting a great sound. See July 1997 Recording magazine about
guitar and speaker miking for a great amount of info in this department.
Speakers have a sweet spot up close and that is where the dust cover meets
the cone. See Fig. 1. If you're going for a more open and ambient sound.
Move the mike back 4 to 8 feet depending on your needs. In this case the
mic can be pointed in the general direction of the speaker and the above
guideline does not apply.

Next week we will cover more specific
mono and stereo techniques and I'll talk about my session in LA this week.
Please fee free to write me with any specific questions and comments you
may have. I love answering individual email and also like to hear if I'm
providing what you need here.
Enjoy and keep your eyes here.
Microphones Part 5
Dateline: 06/10/97
Last week we layed out the miking
of guitar, percussion, speakers and
more.
This week more miking in very specific situations. Two weeks from
now I'll be back from a trip to Germany
where I'll be doing some live
sound for the Bergerfest in Regensburg.
Even though it's not recording I
know a lot of you have interest in live
sound so I'll be dedicating one
feature to live miking and mixing.
Monday and Tuesday of this week I was
in Los Angeles again working on the ongoing Jazz project I've been recording.
We are doing the project at Mad Hatter which is owned by pianist Chick
Corea. This trip the goal was to overdub piano on 12 songs and cut two
new ones. One live with upright bass and one solo piano. We used one of
the two 9 foot grand pianos available in the A room. One is a Bosendorfer
that is midi'd and the other is a Hamburg Steinway. We chose the Steinway.
I chose two AKG C-12 microphones and went through some outboard Class A
Neve 1073 mic preamps. We went through a number of miking and pattern choosing
scenarios until the artist had exactly the sound he was looking for.
Nuts and Bolts of Recording the Piano
As we talked about last week, acoustic
piano lends itself well to stereo recording. There are a number of miking
techniques you can use depending on the sound you're going for and the
room you're in. If you're in an acoustically poor room, the piano is best
miked up close so you don't have to fight with bad ambience. If the room
is a good one you can move the mikes back and get more of an open sound.
Just a foot either way can change the tone a lot. I'm going to cover 3
basic techniques, two close and two pulled back.
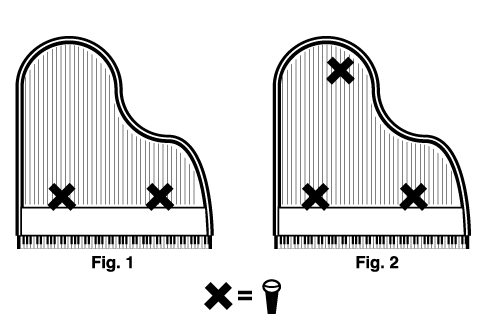
Figures one and two show two techniques,
one using two mics and one using three. Three mikes would be used when
you want more low end and you're not getting it from two. I used to use
this technique often but have gone for a more organic open sound recently.
The mikes should be equidistant from the strings at about 6 to 8 inches.
Always check for the phase
relationship by putting the console in mono and flipping the phase button
on the console. If you hear an absence of low end when you flip the button
then you have your mics too close. Refer to the feature on mic placement
for some pointers on phase.
Figure three illustrates how I miked
the piano for this session. By the way, the lid to the piano was opened
to the long stick. The mikes are about heart-high if you're standing next
to the piano and just inside the outer lip of the lower frame. The on-axis
part of the mic is pointing towards the strings at a 45 degree angle. With
this scenario you can move the mikes back or closer to get more ambience.
This is very subjective and will vary depending on the piano, player, type
of music, and the room you're in. You'll notice I used the mics in spaced
pairs rather than in an x-y configuration. This is because the
x-y technique works best with smaller capsule microphones. Because
of the capsule geometry in larger diaphragm mics, the off axis response
can be boomy in the cardioid pattern. If you use the x-y you're exposing
this off axis side of the mic to the center of the instrument. Spaced pairs
is a better way to go with large diaphragm mics in cardioid pattern.
Picking a Pattern
Once we decided on the mic position we
experimented with switching the patterns on the mic. We went from full
omni to cardioid, passing super and hyper cardioid along the way. We recorded
a bit of each and then listened back. We decided that a wide cardioid was
the best sound. As far as EQ, I added 2dB at 12K to get some "air" on tape.
We are using analog two inch and I use a bit more EQ when going to analog
than I do with digital. The reason is because if you add it later during
the mix (which I usually do anyway) you are also boosting tape hiss.
Keep your eyes on this page for further
and new developments. I'm hashing around some new ideas like having an
audio gear feature page and possibly an audio chat room. I need your feedback
on these. I haven't been getting much email and I really would like to
hear if you're liking the direction the page is going.
Microphones Part 6
Dateline: 06/17/97
The objective for this session was to
record an upright bass and piano together on a nice jazz ballad. I felt
that close proximity of the players was more important than isolation in
this case so I opted to have the players in the same room. My assistant
Darren built a nice portable "room" around the bass player, (bassist, Paul
Morin of Los Angeles), using some gobos. A gobo (short for go-between)
is a portable wall on wheels that is about 7 feet tall and 6 feet wide.
There is sometimes a window at the top so players can see each other. In
addition we put a carpet down on the floor underneath the bassist. If the
song had been anything but
a ballad I might have opted to put the bass
in an iso booth, but this worked great for our purposes. See figure 1 to
see the placement of the players in the room.
What Mics to Use?
The mics I used for the bass were two
Neumann U-67 microphones (large diaphragm mics are my preference). One
about knee high pointing up at the bridge and the other about heart-high
pointing at the strings, both mics about 18 inches back from the instrument.
Both mics were put through the board and I added a couple of dB at 56 Hz
on the lower mic. I also put the lower mic through an LA-2A compressor
to tape. There was some leakage of the piano onto the bass mics but not
enough to be a problem and the overall effect was like you were in the
room listening to the players. Very nice and intimate. The upright had
a pick-up on it but in my experience these never sound as good as having
it miked live. On the third take the players locked and rendered a beautiful
take of the song. It was a pleasure working with such pro's with nice instruments.
Live Sound Primer (or making lemonade)
Dateline: 06/24/97
Last week we got into miking techiques
and choice when recording an upright bass. This week I'm taking off on
a bit of a tangent but it's related as far as mic placement and getting
the most out of the situation you're in. My approach to live sound incorporates
a lot of the things I've learned in the studio and through watching how
others work, namely Robert Scovill and a few other colleagues where I teach.
From watching them and asking questions, I've been able to get a lot of
cool info that I incorporate when I do the occasional live sound gig. This
last week I was at the Burgerfest in Regensburg Germany. There were 16
stages set up around town ranging from the small stage set up for dance
and theatre to the very large setup for bigger bands. I was traveling with
a 20 piece band that included dancers, singers and musicians. We were exposed
to the very inadequate to the more than adequate stages in this large venue.
I'm going to use this week to
give you a quick overview on live sound
and the theories I've used to make it work especially when you have limited
resources.
Problem: You have a rhythm section including
drums, bass, two guitars, two singers up front, four trumpets and a sax.
You only have a ten channel mixer and 9 mics.
Solution: Punt. This was a bit scary.
The venue was a large, open outdoor plaza with a nice size stage. But the
sound system was woefully inadequate as was the mic selection. This was
to be the worst of scenarios for these four gigs we were to play. I had
to cover all the instruments and singers with the nine mics. In addition
there was no snake, so I had to mix from the stage. YIKES! I basically
just laughed and made lemonade. You've got to accept the fact that it's
going to sound bad no matter what, but you can still make the best out
of the situation with a careful setup and plan.
First off you've got to have someone
in the audience whose ears you trust. For me that was my chum Steve Olea.
In addition to helping me set up he was to be the point man who was to
tell me what was going on "out there". My plan was VERY basic. Drums got
a kick and an overhead mic. The drum kit had a front head on the kick which
due to a quick setup I had no time to alter. If I learned one thing this
gig it was, ALWAYS take off that front head. Even if you have to duct tape
the drummer to stop his protests. In the studio, when the drummer has insisted,
I've miked a kick drum with the front head on, never liking the outcome.
I can surely say that I didn't like the outcome live either, too much leakage
and no low end or beater definition. We ended up dumping it after the first
song, leaving the drum kit way undermiked. But success is learned from
a pile of mistakes and we all make them. Next I gave the trumpets two mikes
along with a vocal mic for the left side of the stage. In addition the
other side of the stage got two mics, one for vocals and the other for
sax. Lastly there were two wireless mics that we used for the front vocalists.
We brought our own with battery powered transmitters and mics, they worked
flawlessly and I was impressed with the level I was getting out of them.
I don't recall the brand but if you're interested send me some email and
I'll find out for you.
After no sound check I just brought up
faders nominally and used the first song to set up my mix. EQ was guess
work as was initial fader levels. I had no compression and no reverb. The
compression is what killed me. The vocals were so dynamic that they ate
up all my headroom and then some. My kingdom for a DBX 160 and a subgroup
insert! Due to the fast pacing and number of cues in the show I had to
remain at the mixing position, never getting to go out and hear for myself
what was going on. So I relied heavily on my point man. Through a number
of hand signals he related to me overall level adjustments. For real trouble
spots he came up to the stage and related what had to be changed. As the
crowd got thicker (1500+) he had to remain out in the house. We got through
the show and
got the encore chant (zu ga-bay, zu
ga-bay) so I guess it was good enough for an encore at least.
Recap
The lesson I learned here was that no
matter how good you think you are, you're only as good as the equipment
you use. No amount of skill can make up for bad or inadequate gear. Humility
is a good thing.
Recording Vocals
Dateline: 07/01/97
What's Important?
One of the most challenging things to
record are vocals. To get the right performance you not only have to be
a competent engineer, but sometimes a cheerleader and psychologist. First
the nuts and bolts of getting a good sound onto tape. I stress signal chain
time and time again and here I'll reiterate. The room, mic, pre-amp, and
tape machine etc...that you use makes a HUGE difference in the sound that
you get. My recommendation is to use the best you can afford. For instance,
I own a pair of Calrec Class A mic preamps that I take to every session
with me. In addition, if the studio's mic locker is inadequate I might
rent a mic or bring my own (I own an AT4050 that does the job quite well).
My favorite choices for female vocal is an AKG C12, for male vocals it's
a Telefunken 251. Both of these are tube mics and sound great. As far as
a limiter it depends on the singer but I love a Sontec or a GML series
III. They are both George Massenburg designs and very transparent. Whatever
your resources are pick the best gear at your disposal.
The Surroundings
Once you get the signal chain set up
and running, then you take care of the recording environment. Too live
of a recording space will kill you with reflections back to the mic. I'll
do anything necessary to deaden up a room. Up to and including nailing
packing blankets to the wall and stuffing foam behind them to break up
the room. Remember you're not only recording the vocalist but the room
that they're in. If they're at your disposal use gobos to build a "room"
around the vocalist. To see an example of this, check out this
feature and see how I did used this technique around an upright bass
at a recent session. In addition I'll lay down a carpet to keep from picking
up tapping feet and generally deaden the floor reflection. Another thing
to keep in mind is the angle and reflection off of the music stand. You
don't want the vocal reflecting off the stand into the mic. This can cause
phase problems (see my feature on Phase).
An easy solution is to put some kind of refractive material on the stand
such as a piece of thick carpeting or a towel. In addition be sure to angle
the stand down a bit so the reflection is going back into the singer's
body and not the mic.
Where Does the Mic Go?
Positioning the mic is crucial in getting
a clean sound without any plosives. A pop screen will be needed in addition
to precise positioning. Plosives are the Ps and Ts that ruffle the diaphragm
of the mic causing much low end information to get onto tape. That is UNWANTED
low end information. Position the mic so the diaphragm is just below the
singers nose and pointing down towards the mouth at about 6 inches away.
Then put the pop screen (a ring with a nylon material stretched over it)
between the singers mouth and the mic. This should be sufficient to do
the job. Some repositioning may be necessary if you're still having problems.
I've also had problems with rattling jewelry and popping gum. I'm starting
to sound like my grade school teachers! But if this gets on tape it will
be impossible to
extract later.
Psychological Aspects
Last and most important is making the
singer comfortable. A great headphone mix helps and I've also brought candles
into the studio and dimmed the lights for a good vibe, whatever works.
I work with one singer who is really great but she has no confidence in
her ability. I make a concerted effort to use no negative language with
her. When she says THAT SUCKED! I say, "that pass was good, now lets go
for blah blah blah" I don't use the word no or don't or never etc.....
only positive
language and encouragement. I've used
this technique a lot and gotten great results. The singer responds to the
praise and positivity and by the end of the session is thanking you for
helping them sing better.
Recording Horns
Dateline: 07/08/97
Recording brass is something you'll come
across time and time again in the studio. Even though synths and samplers
are able to copy a lot of sounds very well, brass are some of my least
favorite sounds from a keyboard. There's nothing like a great brass section
playing a great chart to really kick a track right in the butt and make
it sing.
The Basics
Getting the most flexibility out of multi-tracking
a varied array of horns can be done easily by simply following a few guidelines.
First, keep in mind that horns play best as a section. There are numerous
cues and signals that a section gets from one another that makes them sound
like a section. Taking one horn and multi-tracking it over and over will
not give you this sound. Your best bet is to find a group of players from
a band or session players who have played together time and time again.
If you have a group of horn players playing together, complete isolation
is impossible. Putting them in separate rooms defeats your purpose. A certain
amount of leakage is inevitable and not necessarily a bad thing. However,
you can limit this leakage by the placement of your players. Figure 1 shows
how I would position and mic a 7 piece horn section. The important thing
here is to see how the placement of the players and the use of a cardioid
pattern (/library/weekly/aa032597.htm) will limit the leakage into opposing
mics. I like to use one mic for the trumpets. This puts the blend responsibilities
on the players, where it should lie. Also the less mics you have in the
room the less phase problems you'll have.
You have to expect a lot of trumpet leakage
into the other mics simply because it's the loudest of all the instruments.
By close miking the trombones and saxes you'll help that greatly. You'll
also notice in Fig. 1 that the mics used for the trombones and saxes are
off axis to each other. This also helps with the leakage. The mic for the
trombones and saxes can be six inches from the bell. If you were miking
these instruments solo you would have the luxury of backing the mics up
a bit. On saxes especially this is desirable because the sound of a sax
does not come solely from the bell but from the keys as well. So if you
back it up a bit you'll get a better sound. However in ensemble the closer
scenario is better.
Track Layout for Flexibility and Big
Sound
By taking the three groups of horns to
three tracks on your multi-track you have the maximum amount of flexibility
when mixing. Doubling is another way to make your horn section sound huge.
To save tracks on the second pass of a double you might combine the saxes
and trombones together and only use two tracks. This way you have the best
of both worlds, individual tracks on pass one and the big sound of a double.
And you save a track in the process.
Recording Drums Part 1
Dateline: 07/15/97
Recording drums is probably the most
challenging situation you will ever come across in the studio. What mics
you use and how you place them is important, but some initial preparation
will help you get great drum sounds and really lay a nice foundation for
your track. In major recording centers like Los Angeles and Nashville,
having a tuned kit with new heads is the standard operating procedure for
all the first call studio drummers. They have full time drum techs who
cart their drums around, change the heads and tune them before each session.
However, if you're working in the other 99% of the country, you as an engineer
might have to take responsibility for making some of those things happen.
When I'm doing the pre-production meeting for a session (which can be as
simple as a phone call), I always tell the band and drummer that if you
want this record to sound great, put new strings on the guitars and new
heads on the drums (tuning an acoustic piano is also a must). No amount
of EQ or signal processing can resurrect a cardboard sounding drum kit
after it's recorded. You must have a good sounding kit up front and it
must be tuned. I found a great tool for helping me tune drums with the
Drum Dial. It's featured under product
of the month, it's worth checking out.
The Environment
Something you need to assess and be aware
of is the room you're recording in. Not only are you recording the drums
but you're recording the space that they're contained in. A room that has
acoustical problems such as standing waves and ugly uneven reflections
can ruin the best sounding kit. If you are stuck recording in a poor room
you may have to put up some packing blankets or use gobos
to help you tame down the room.
Now that we've established the importance
of having a good sounding kit and room, the next step is to get it on tape
(or hard drive). Making a drum kit sound like one organic unit is always
my objective. For starters, stand in the room as the drummer plays and
actually hear what the kit sounds like in that space. Then try to emulate
that as much as possible. Because of the number of mics used in recording
a kit, you could run into the problem of it sounding too much like a collection
of separate drums. You want it to sound more like a whole instrument rather
than a group of individuals.
Recording Drums Part 2
Dateline: 07/22/97
Last week we discussed the importance
of a good sounding drum kit and a
room in which to record it. We're now
ready to talk about the
microphones we'll need to get the job
done. Every engineer has his/her
own favorite mics that have gotten the
job done. I'm going to give you a
number of options that I have tried
and that have worked for me.
Kick drum:
You need a mic that will handle the high
SPL of a kick and also cover the low end as far as frequency
response goes. Some choices are:
AKG D-112, D12
Sony C-500
U-47 FET
CAD
E-100 (click on the hot link for a review)
ElectroVoice
RE-20
Sennheiser
421
ATM-25
Audix D4 (haven't
tried this one personally but heard good things)
Snare drum:
Shure SM-57
Shure Beta
57
I've tried a number of others but still
keep coming back to this simple, inexpensive mic. I love it. Another option
is to use a second mic on the underside of the snare drum. This can be
another 57 or perhaps another dynamic mic like the Beta 57. If you have
a condenser that can take the
SPL
then by all means try it. The idea of this mic is to accentuate the sound
of the snares on the underside of the drum. Mixed with the top mic it can
give you the snap that you need and aren't getting from the top of the
drum.
Hi-Hat:
ATM 4041
Neumann KM-84
Shoepps
Toms:
AKG 414 (only
if you've got a drummer you can trust!)
ElectroVoice
RE-20
Sennheiser
421
Sennheiser
504 (new light, low profile mic, very nice for live too)
Overheads and room mics:
AKG C-12
ATM 4050
Earthworks
TC40K, TC30K (these are fixed omnis but worth a try, your sound will tend
to be wider in stereo rather than tight, click on the hot link and read
my review of these mics)
AKG 414
Shure SM81
B&K (cardioid)
Basically any matched pair of condensers
will work here if you're stuck, for the most part you'll want a cardioid
pattern for the overheads and you can experiment with the room mics.
These mic choices are just guidelines.
You may have your own favorites or want to try others. The important thing
is to get the killer sound that you need to make your track a standout.
Next week will be covering microphone placement for all the different drums.
Recording Drums Part 3
Dateline: 07/29/97
Kick drum:
The best scenario is to have the mic
inside the kick drum. You'll never get great beater definition and isolation
if the mic is outside the front head. I've heard of guys miking the outside
of the front head and then miking the beater side. I've tried this and
it was a nightmare of leakage and didn't work for me. I like to put the
mic inside the drum. This can be accomplished by taking off the front head
or if there's a hole in the head, putting the mic through and positioning
it inside. If the head is all the way off then you must build a little
isolation "house" around the outside of the front of the kick. A chair,
some duct tape and a packing blanket or two will work nicely for this.
This will help isolate the drum and your mic. In addition you may need
to put a blanket or a pillow inside the drum to deaden the inside a bit.
A kick that's too live will give you little definition and can be ugly.
DW
Drums makes a nice hourglass shaped pillow that is cheap and works
great.
I place the mic a little more than half
way into the drum and point it just to one side of the beater. I've seen
others put it more off axis to the beater head depending on what the drum
sounded like. You'll have to experiment and see what's right for your particular
situation.
I recently talked Robert Scovill about
how he miked Neal Peart's kicks for the most recent RUSH tour. He came
up with a home rigged mic assembly for the inside of a kick that has the
front head on it. He criss-crossed some cables that he rigged on the inside
of the kick and fixed a mic clip to it at the center. He used turnbuckles
to get the mic clip placed precisely where he wanted it. Once he fixed
the mic inside he closed up the outer head. The cable came right out of
the drum and could be sent to the snake easily. Kind of a cool solution
I thought.
Snare drum:
Snare is miked as in Fig. 1. About 2-3
inches off the head and pointed in from the side. This keeps the mic out
of the drummers way and vice versa.
Toms:
Tom miking is very much like the snare
in Fig 1. In addition sometimes if I'm not getting enough low end from
my low tom I'll put a condenser or a D-112 underneath the bottom head.
This is then mixed in with the top mic, and after checking for phase, it's
sent to a track on the tape machine.
Hi-Hat:
There are a number of different scenarios
for hi-hat miking. The desire is to keep the other drums out of the hat
mic as much as possible. I've seen it pointed away from the drummer and
down at the outer edge of the hat from the top. You have to watch that
the mike isn't pointed at the bell because it will sound very pingy and
thin. In addition don't get too close to the closing edge because a puff
of air comes out every time the hats close and that can ruffle your diaphragm
and make for nasties on tape.
Overheads and Room mics:
Overheads can be placed in an x-y configuration
or in a spaced pair. (see the feature on mic
placement) If you use omni patterned mics then the spaced pair is the
way to go. Large diaphragm condensers tend to work better in spaced pairs
also. Small diaphragm mics work great in either miking scenario. In general
I put the mics about 6 to 7 feet from the floor and if spacing them try
to capture a balanced sound from all cymbals and toms.
Room mics can be placed equidistant from
the front of the kit and back. How far back and how wide you place them
will determine how big your room mics sound. Remember that for every foot
you add one millisecond of time delay from the source. So if your room
mics are back 10 feet you're mics will have a delay of about 10 milliseconds.
The best rule is to experiment and see what you get and if it pleases you
and compliments the music then go for it. I always print room mics separately.
Once again these are just guidelines.
A lot of people have different techniques and you should make yourself
aware of as many as possible and try them for yourself.
Recording Drums Part 4
Dateline: 08/05/97
Track Sheet Layout
How you lay out your track sheet depends
greatly on how many tracks you can afford to dedicate to your kit. The
best scenario is total isolation of all drums. I like to dedicate a track
to each tom also but you can afford to sum these to stereo if you're stuck.
The reason for all the isolation of course is to be able to treat each
individual drum with, EQ, panning and reverb. Once you sum drums to stereo
you'll not have the flexibility necessary to do this. (see August
'97 Question of the Month). So for our purposes let's say you have
24 tracks available. Below is an often used layout for drums within this
framework.
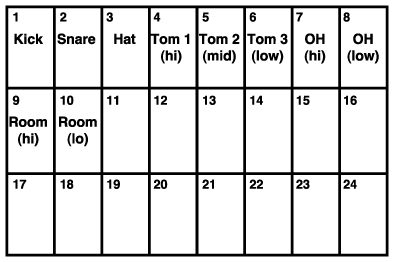
Notice the extra info as far as panning
and which side of the kit the drums are from. Very important info for the
next engineer down the line. You might also include what mic you used.
As far as EQ goes, I've said in the past
that EQ is the LAST thing you should do to make something sound better.
Mic placement and choice is your first refuge when things are not sounding
good. Also keep in mind that new heads and tuning goes a long way in making
a drum kit sound great. (keep your eye here for an in depth feature on
drum tuning) In light of that here's some general EQ I use when tracking.
Kick drum:
Boost at 50
Hz
Cut around
400Hz if drum is sounding boxy
Boost at 5Khz
to 7Khz
Boost at 10Khz
to bring out beater definition if needed and present
at this frequency
Snare drum:
Boost at fundamental
of around 250Hz
Boost at 4
to 6Khz for snap
Boost at 10Khz
for crispness
Hi-Hat:
Boost at 10Khz
Rolloff low
end below 150Hz or higher to de accentuate adjacent
leakage
Toms:
Boost 10Khz
Boost 4K to
6K for presence if needed
Overheads:
Boost 10Khz
shelving for air
Roll off low
end below 60-80Hz if overbearing
This is all very subjective and depends
on the kit you're recording. So it's NOT gospel just meant as a guideline.
I never gate to tape always on the rebound and I always EQ to tape especially
if analog. Everyone has their own particular style of recording. This is
mine. You will be a better rounded engineer by getting a lot of different
perspectives on recording and taking what you like out of that. This will
develop you're own style.
Recording Electric Bass
Dateline: 08/12/97
Direct or Miked?
There are two ways of getting the electric
bass to tape. Taking it directly out of the instrument through a direct
box, or miking a bass cabinet. A lot of the work I do as far as recording
this instrument is done direct. It solves a lot of leakage problems and
generally sounds very good. This is not to say you can't mike a cabinet
as an option. I would do this as an addition to a direct signal and not
exclusively.
A direct box is needed because most professional
consoles have balanced inputs. Also a console likes to see a low impedance
input. The signal out of a bass or a guitar is high impedance and unbalanced.
(keep your eyes here for a complete clinic on balanced vs. unbalanced)
A direct box is kind of a translator that takes an unbalanced high impedance
signal at the input and produces a balanced low impedance signal at the
output. Direct boxes come in passive and active varieties. An active DI
needs power to run. Either will work and a lot of engineers have their
own favorites. Personally I like to use my Calrec mic preamp as a DI at
the front end.
A DI (slang for a direct box - it means
Direct Input) will have a balanced out and also a thru so you can take
the unaltered signal from the bass and plug it right into an amp. This
is invaluable for live situations where you'd want to take the DI signal
through the desk and loudspeakers and also have the bass plugged into the
player's bass cabinet on-stage.
It's common to compress the bass signal
to tape in order to limit it's dynamic range and keep the bass up in the
mix without eating up all your headroom.
Compressors and their operation will be covered extensively in the upcoming
outboard gear series here on this page.
If you are going to mic the bass speaker
follow the speaker miking guidelines covered in our 06/03/97
feature. Using these guidelines will help you get a nice clean signal onto
tape without a lot of leakage headaches. Direct input is a great way to
record the electric bass.
Advanced Drum Tuning
Dateline: 08/19/97
Tuning is the thing
Some of you use a house drum kit when
you record. Whether it be your own kit or one you have access to, accurate
tuning can make your recording experience a pleasant one. In an earlier
feature we talked a bit about the importance of tuning drums. Now we
get down to the meat and potatoes of tuning. I'm sure you've all heard
the joke about the drummer who says "You mean you can tune these things?"
It's the last thing a drummer learns if at all and it's THE most important
thing in recording. If you have garbage as your source, even the best signal
path won't help you.
I have to give all of the credit for
the following information to the DW
Drum Company. A student of mine compiled their data for a recording
business presentation. I've just paraphrased it for you here.
Theory and Execution
Each shell of a drum kit has a resonant
frequency. The frequency can be found by removing all the hardware, suspending
the drum and tapping it to find the tone. This can then be matched to a
tuning fork etc. as a tuning source. Once you find the resonant tone you
use this to tune the drum heads.
The important thing is that no two drums
of different sizes overlap each other's timbral frequency range. Ultimately
you want a set that's matched in tone. The intervals far enough apart so
the drums complement each other without the sympathetic vibrations causing
problems. Bigger drums such as the kick and low tom should be a fifth apart
where as you get smaller and smaller it can be a fourth apart. DW matches
their drums in this way and sells the sets with complimentary midrange
timbres and traditional intervallic relationships. However you can find
the pitch of any drum in the way I described above.
Once the pitch is found you can then
match the upper and lower heads to this pitch. Then using a precision tuning
device such as the
Drum Dial
you pitch the upper head up and the lower head down a bit from the shell's
pitch. This makes the drum heads ring with a sympathetic tone and have
a desirable sustain and timbre. When you tune a whole kit in this fashion
and memorize the settings on the drum dial, it's just a matter of keeping
the kit maintained properly. It's science when you use the proper tools.
I can't stress enough the importance of getting into recording on this
ground level. You can't expect merely a knowledge of consoles and microphones
to get you through a session. It's important to know a lot about guitars,
drums, humans etc. to get you great results. Keep your eyes here for more
info along these lines.