The Properties of Sound Part 1
Dateline: 04/15/97
Before we get into the specifics of mic placement and a lot of what might be foreign looking gear and situations, I think it's a good idea to lay some groundwork. These next four or five features will deal with the basic properties of sound and how it works in our environment which is air. These properties are not just book terms or boring edu-babble, but practical everyday things that you'll come across time and time again. Things like phase and how sound changes over time (called the envelope). We'll be tying in each concept with a real life application. So hang in there. If you're way ahead of me on this check back in a few weeks and we'll be covering the more advanced topics. Also, I just got my hands on three different mics from Equitek. The E-100, E-200 and E-300. I've never used these mics so I'm going to give them the complete once over. It will probably be featured in mid-May or so. Keep your eyes here for great stuff! These reviews will be a Mining Co. exclusive.
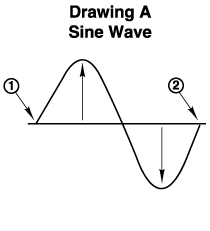
We will concentrate on two properties of sound this week. In order to study sound in one dimension we will use the drawing of a simple sine wave. A sine wave is like the tone you hear in the Emergency Broadcast System alerts. It is a pure tone with no overtones. Drawing A is a sine wave.

Amplitude
The first property of a soundwave we're going to dive into is amplitude. It has to do with the distance above and below the centerline of the soundwave. The center line is the horizontal line, it is zero degrees. The vertical arrows in Drawing A denote amplitude. Simply stated, the larger the distance above and below the line the louder the sound. I always remember that this has to do with volume by keying in on the word AMP in amplitude. If you were a sound editor or were doing some digital editing on a DAW (digital audio workstation), you'd be dealing with amplitude every day. The displays of most workstations show the recorded sound as a left and right soundwave. The left and right waves (denoting stereo) sit inside two rectangular boxes, one on top of the other. As the sound plays, the display will scroll and you will see the overall volume of the complex wave as very tightly compacted vertical lines. If the line exceeds the box in some cases you cause distortion. So the display of the amplitude of the wave can tell you right away if you've exceeded the headroom of the system. A very important display to say the least.
Frequency
The second property is frequency. It
is measured in Hertz
and has to do with how many cycles per second the wave goes through. One
cycle is when the wave goes up, down through the line and back up again
to the starting point. The beginning and end of a cycle is shown by numbers
1 and 2 in the drawing. This measurement can be taken anywhere in the wave
as long is it ends up where it started. The numbers of times this happens
in one second is the frequency of the wave. The more cycles per second
the higher the sound. So frequency has to do with pitch. Every musical
note, for instance, has a related hertz value. You see frequency represented
on recording consoles and a lot of outboard gear. For instance, in the
EQ section of some consoles you are able to sweep a band of frequencies
to choose which one you want to boost or cut. Knowing how certain frequencies
effect the sound of an instrument can make it easier to EQ that instrument
and change the personality of it. This in turn can help you fit those sounds
better into a mix and make it stand out more, or not. For instance, 20Hz
to 100Hz provides bottom, 100Hz to 200Hz warmth, 500Hz to 1500Hz definition,
1500Hz to 4KHz Articulation, 4KHz to 10KHz Brightness and 10,KHz to 20KHz
air. As an engineer, frequencies are the paints you use on the canvas of
sound.
The Properties of Sound Part 2
Dateline: 04/22/97
Velocity
This is a rather simple and precise property of sound. Sound travels at a set speed in our medium which is air. The speed of sound in air is 1,130 ft/sec in air at 70 degrees Fahrenheit. For every degree you go above or below 70, it changes the speed by +/- 1.1 ft/sec. So at 80 degrees, sound travels at 1141 ft/sec. Warmer air is less dense and sound can travel more easily through it. Where this fact comes in handy is when you are trying to time align a sound system. Let's use a large scenario to illustrate this. Say you have speaker stacks on the stage of a large venue, and another set of speakers three hundred feet out from the stage to cover the back of the venue. The people sitting between the stage and the outer stack will have no problems. But the seats in the back of the venue will be getting a huge delay between the stage stacks and the back stacks. To fix this you'd delay the back stacks an appropriate amount so that the sound from the stage and the sound from the back stacks arrive at the listener at the same time. You could use the speed of sound to easily figure this out, then run the line outs to the back speakers through a delay line and time align your system.
Wavelength
Wavelength has to do with the fact that when pitch/frequency rises and falls, the actual size of the wave changes. As pitch/frequency drops wavelength gets larger, as it rises it gets smaller. There is a formula to find out the physical size of a wave. The formula is:

V stands for velocity and we already know the velocity of sound. F is the frequency we're looking for and the lambda character is the unknown wavelength. Let's plug in a few simple numbers and see what kinds of sizes we're talking about. If we're looking for the wavelength of a 10KHz wave, we plug in 1130 into the V's space and 10,000 into the F's space. We can then figure this one out by simply counting the zeros and moving the decimal over. For instance 10,000 has four zeros and if we move the decimal over 4 spaces on 1130 we get .113 feet as our answer. By the way this counting zeros method only works on numbers with a one as the first digit and the rest zeros. So a 10KHz wave is a little more than an inch. Not too big. Now let's figure out the wavelength for 100Hz. Count the zeros (two) and move the decimal over two and you get an answer of 11.3 feet. Quite a difference. What this shows is that low frequency waves are not only bigger than high frequency waves, but downright huge. For instance a 10Hz wave would be 113 feet. The size of a 747!
The Physics of Frequency
Since our hearing only goes down to about 20 Hz, these ultra low frequencies are inaudible. But that doesn't mean they can't be used to carry information. For instance if you saw the movie Crimson Tide. The main characters were in a submarine and were waiting for a VLF transmission to verify a nuclear attack. VLF stands for Very Low Frequency. Because low frequency waves (in this case radio waves) are so big, they will literally go through anything providing they have enough power. Some smart cookie figured out that if you transmit encoded messages on a very low frequency radio wave, bounce it off the Stratosphere and into the ocean, submarines can pick up the signal while they're submerged. Keep in mind that they transmit these signals from somewhere in the midwestern US. We're talking about a massive amount of power and a huge wave.
The size of the soundwave directly influences how we discern it's direction. High frequencies are said to be uni-directional. Because of the short wavelength, the wave goes through many cycles before it reaches our ear and we can determine it's direction easily. Low frequency is said to be omni-directional. Because of the huge size of the low frequency wave, it may not have even gone through half of it's cycle before it reaches us. It is bouncing off of walls, ceilings and floors and we cannot determine it's direction as easily. That's why when you put a sub-woofer in a sound system, you can place it on the floor in a corner. Because it makes no difference where it is because of it's omni characteristics.
These first weeks we are laying a foundation
and a kind of audio library that you can refer back to time and time again.
By linking to previous features you can access the topics from this pages
inception. I hope you're enjoying it and finding it useful. As always I
want your feedback on this page and what we're doing here. This is YOUR
page and I want to make it the best that I can. Write me with any and all
ideas, praise and criticisms.
The Properties of Sound Part 3
Dateline: 04/29/97
So far we've got an overview of Amplitude,
Frequency, Velocity, and
Wavelength.
This week we tackle a very important and very practical
property of sound, phase. If you've
ever heard the term out of phase and
wondered what it's all about, read on.
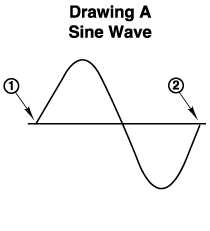
Phase has to do with the relationship of one soundwave to another. Two weeks ago (see previous feature 04/15/97), we discovered what amplitude and a cycle of a wave is. To quickly re-cap, a wave's cycle runs either above or below the centerline to start, comes back through the line and loops up again to the starting point, encompassing 360 degrees like below:
If two waves see each other and they are in a completely opposite phase relationship, as in the next drawing, they are said to be 180 degrees out of phase.
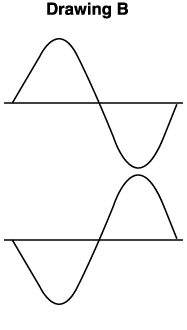
If the waves are equal in frequency and amplitude and 180 degrees out of phase, they will completely cancel out and the end result will be 0dB. You know from simple math that when you add equal negative and positive numbers you end up with zero. This is exactly what's happening with these out of phase sounds. For every positive excursion of the wave there is an equal and opposite negative excursion. The sum of these two adds up to zero. In addition, waves can meet each other in varying degrees out of phase. 60 degrees or 100 degrees for instance. In that case instead of canceling out, the waves will boost some frequencies and cut some others.
Phase Trickery
To demonstrate how this is used in a real life situation to get rid of unwanted sound, think back to the last time you heard a helicopter traffic report. What was missing? The sound of the helicopter was missing. If you've ever been inside a helicopter you know that it's extremely loud, too loud to carry on a conversation without yelling. Now you've got a traffic reporter with a headset mic on and he's talking in a normal tone of voice and you're understanding every word and just hearing a gentle whirring in the background. How did they do it? You could use the properties of phase to help you. Take the headset mic, which is picking up the voice of the pilot, and the ambient noise of the copter. Feed it into a mixer which is also receiving a feed from a second mic somewhere in the cockpit. This second mic is just picking up the ambient noise in the cockpit. Put one of these signals out of phase and sum the two signals and what do you have left? Of course the voice is the only thing remaining. It's the only part of the sound that's not common to both mics. The ambient noise cancels and the voice doesn't. Very slick. Of course there are some other things added into the equation to make this work. Powerful real-time adaptive filters are needed to constantly track the interference and account for the difference in the interference picked up by the interference mic and the interference picked up by the wanted signal mic.
The Good, the Bad and the (out of phase) Ugly
While out of phase signals in the previous examples are a good thing and useful, out of phase signals in the studio are something that are not desirable. Not to say it can't be used creatively, but in general it's not a good thing. There are a few areas where out of phase stereo signals can get you into trouble. But before we get into that, let's describe what you will hear, both in stereo and mono, when two signals are 180 degrees out of phase. In mono, the effect of two stereo signals being out of phase is drastic and undeniable. Whatever signals are shared by both speakers in a two channel system like your home stereo will disappear. In stereo the effect is not as drastic but with a few repetitions you can hear the difference. You will hear the following things in a stereo signal that is out of phase.
Absence of center
image
Absence of
low frequency
By center image I mean the effect of what's called "phantom image". When you sit between the speakers, whatever is shared by both speakers, is heard in the center (that is on a system that's in phase). When that same system is out of phase that center image is gone. By low frequency I mean that things in the mix that occupy the lower end, like Kick drum, bass guitar etc. When low frequency is absent, the signal sounds very "thin".
Absolute and Relative Phase
If you don't have a console at home that will allow you to flip phase, you can do a little experiment at home that will allow you to put your speakers out of phase and hear the effects I'm speaking of. Simply go behind one of your speakers and switch the wires from positive to negative and negative to positive. This will put one speaker out of phase and also your system. Then sit between the speakers and listen to your favorite CD. Then flip the speaker back again and compare. Notice the difference? By the way, putting both speakers out of phase is called being Absolutely out of phase and it will sound normal to your ear. This is because both speakers are out of phase and have nothing to relate to. The other way, where only one speaker is out of phase is called being relatively out of phase.
Because of the complexity of this week's
topic, we're going to break it up into two features. Next week we'll talk
about how you can stay out of phase trouble when miking anything in stereo.
Stay tuned and stay healthy.
The Properties of Sound Part 4
Dateline: 05/06/97
Last week we talked about the phase
relationships between two sound
waves and how it can effect the sound
of your audio. We discussed how a
whole sound system can be out of phase
simply because two wires are
switched on a speaker or amplifier.
This week we'll see how microphone
placement can also cause your signal
to be out of phase.
When you are miking an instrument in stereo, say a piano or an acoustic guitar, there is a possibility that the two mics could be seeing the signal out of phase. This is because of the location of the mic in relation to the cycle of the soundwave. If one mic is seeing the wave in the positive part of the cycle and one on the negative, then the mics will be out of phase with each other. This can happen in situations where you are miking something up close with mics equidistant from the source as well as when the mics are different distances from the source. For instance if you are miking a sound source with one mic up close and the other a bit back in the room so you can pick up some of the ambiance, there is a chance that the mics might be out of phase. See Drawing A:
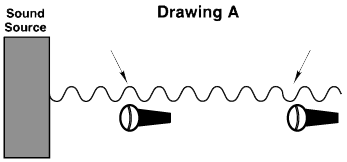
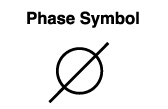
As you can see, one mic is seeing the wave at a peak and the other at a trough. To fix this you'd simply have to move one of the mics up or back until you heard that the signal was in phase. To re-cap what an out of phase signal sounds like, you are listening for an absence of low frequency or cancellation of the signal. The best way to troubleshoot this is to put the console output into mono. Bring the volume of the two mics up at equal levels and then flip one or other of the mics out of phase with the phase button on the console. Most mid to upper price range consoles will have a phase button on each channel so you can check for phase easily. If your home system does not have it you can wire a cable out of phase and put it somewhere in line with one of the mics. Either in your patch bay or between the mic and the console. Although a bit cumbersome it is the same thing as pushing a phase button. To wire a balanced connector out of phase, you simply swap pins two and three (XLR) or the tip and the ring (TRS) at both ends of the cable . Then the whole cable will be out of phase. If you are looking for a phase button on a console or on a piece of outboard gear, it is usually represented by the following symbol:
The Three to One Rule
The other situation we talked about was if the two mics were equidistant from the source. This is a very common way of miking an acoustic guitar or a piano for instance. In this case you can follow what is known as the Three-to-One rule. This rule states that for every unit of distance away from the sound source, your mics should be at least three units apart. For instance, if your mics are six inches away from the source then they should be eighteen inches apart. If they're 1 foot from the source they should be three feet apart. This will keep you out of phase problems when close miking.
We will be exploring other miking techniques in an upcoming feature. Also keep your eyes here for the Equitek mic reviews, they should be up in the next few weeks. In the meantime, stay positive and stay healthy.