Production Tips Part 1
Using Your Multi-Track Advantage
The great thing about multi-track recording is that you get multiple chances to get things right. Punch-in and punch-out is the ability to repair or ad to an existing track. This involves being deft enough to get in and out in a space where the finished product sounds like you were never there. Finding your spots before you punch is essential. I will actually practice making the punch in my head before I ever press the record button.
Every machine and format has it's own punch-in/out idiosyncrasies. For instance there is one manufacturer's 24-track analog machine that mutes the audio for just a split second when you're punching into an existing track. So you never know if it worked until you listen back. You will however over time get a feel for your format and machine.
Becoming a Punchmeister
Honing your punch skills is just a matter of practice but there are some tricks you can use, especially on digital machines, that can really help make your job easier:
Using the cross fade
Most digital machines will give you cross-fade options. This is the ability to choose the amount of time it takes to get from your existing material into the punched in material and back out again. On an ADAT machine the default is about 10ms but you can alter that if need be. I always use the default unless I'm having a problem. For instance on a recent project I had a dilemma that involved a vocal performance. The singer held a note that went out of tune half way through the note. There was another held note that was perfect but the way she got into the note was not good. So I set the crossfade to maximum and as the note started to go out of tune I punched in the other track. With a few tries I found the spot where the punch sounded seamless. Cross-fading works.
Working with a digital copy
The beauty of digital is that you can make a carbon copy without suffering the same generation loss that you would with analog. This way if you are uncertain whether a punch will work, you can make a quick copy of a section of a track and work with that. This way if you goof up the punch irretrievably then you can always refer back to the original. This usually only takes a moment to do and is cheap insurance. When the punch works on the copy you can then seamlessly fold the copy back into the existing track.
Using the Rehearse button
If you're dealing with existing tracks
and you just want to see if a punch works, use the rehearse button. A rehearsed
punch is a non-destructive punch. Once you decide the punch will work then
you simply take the machine out of rehearse and make the punch. Even easier
is if the machine has an auto-punch mode like the ADAT
BRC. The BRC memorizes the last punch you make and stores it in registers
21 and 22. If you rehearse your punch and it works you would then take
the machine out of rehearse, put the machine in auto-punch and choose registers
21 and 22 as your in and out point. Then push play and record and watch
the machine do your work. If then the punch is still not perfect you can
alter the in and out points manually by raising or lowering the numbers,
depending on if you want your punch-in/out later or earlier. This is a
skill I use all the time when I'm using ADATS and it saves time and is
easy to do.
Where's the Beef?
Sometime there is that certain "something" that's missing from certain tracks, be it vocals or instruments. It may not call a reverb with a longer decay and you're at a loss for how to make the track speak above the others. A very common pitch shift program that appears on most multi-effects processors may be the ticket. This in combination with a short room or small ambient space can sometime make a track sing.
How it Works
Pitch shift programs operate on a few levels:
Pitch Change in Stereo
Pitch is broken down in two increments, they are often called Course and Fine adjustments. Course is in half steps (semi-tone) usually up to an octave or more. Fine adjustments is broken down to what's called cents, that is 1/100th of a semi-tone. Fine adjustment is indeed a very small amount of pitch and for our purposes this is a good thing. If you do some experimenting you'll soon see that course adjustments give you that mickey mouse on helium kind of sound that never works in a musical sense.
Stereo Delay
In addition to pitch adjustments you can also adjust the delay of the left and right output of your device in stereo. You'll soon see that we just use a taste of this to give us the sound we're hunting for. The increments are usually given in milliseconds. You can easily visualize the amount of delay you're dialing in by thinking of each foot back you are from your original source is equal to about 1ms of delay. So if you wanted to create an effect that you're listening to something from 20 ft. you'd dial in 20ms of delay.
Feedback
In addition to pitch change and delay, most programs will give you a feedback control. For our purposes here we won't be using any feedback but experiment with it a bit and listen to what it does to your sound.
The Setup
To make this all happen follow the steps below:
From an aux
on your console setup your effects device (be sure it
has a pitch
change program available) and bring it back to the
console, see
my feature on setting
up a parallel device for an
in-depth explanation
on this procedure.
Use the aux
to send the track you want to the effects device
Dial up and
load the pitch change program
Set the LEFT
COURSE adjustment to ZERO, set the RIGHT
COURSE adjustment
to ZERO
Set the LEFT
FINE adjustment to plus 8, set the RIGHT FINE
adjustment
to -8
Set the left
and right delay times to somewhere between 10ms and
15ms but set
each side different
Set the Feedback
on both sides to ZERO
Experiment with the FINE and DELAY adjustments
on both sides to get the effect thicker or thinner depending on what you
want. In addition, use your effect's return faders to set the level of
"wet" signal in the mix. Sometimes if an effect is heavy-handed it's just
that it's too hot in the mix. Use this effect on lead and background vocals
or instrumental tracks such as shredding guitars or a sax solo to really
give your tracks some edge. Remember this shouldn't have to hit you over
the head. Sometime if it's just audible it can add the effect you need
without being overbearing.
Tradition
There's a lot to be said for doing things the old fashioned way. But when circumstances beyond your control present you with special problems, then you've got to venture outside traditional boundaries. The way that tracking a song usually starts is to get the band all set up, then record the basic tracks for all your songs in a series of sessions. The advantage of one setup is that your tracks will have continuity. It's very hard to tear down and setup a session repeatedly and maintain a consistent sound for all the tracks. So, in this sense the traditional tracking session is the best route to choose.
Alternatives Anyone?
What if you have no band in the traditional sense? Say your production is based on MIDI'd tracks and you plan to sprinkle some live players into the mix, just to take the "freeze dried" edge off the tracks. In this case you'd lay down the MIDI tracks first. For instance, the followint is the pre-production for a session I recently completed. I went to the artist's home studio and laid down the following sequenced tracks.
Various keyboard
parts
Percussion
(multiple layers)
Scratch BassClick
track
All these tracks took up approximately 24 tracks (we recorded to the new 20-bit ADAT XT in multiple synced passes). This last weekend we then did a session at a larger studio where we laid down live drums with live electric bass, then piccolo bass and sax as separate overdubs. The song took on a whole new life with the live players and the latter sessions were basically all overdub sessions. No tracking in the traditional sense.
Kenny G Sessions
For Kenny G's Breathless CD we worked in a similar manner. Kenny would compose the song using his computer and MIDI gear. Then we'd sync the multi-track to the computer and record the sax to a Sony 3348 digital machine. At this time the only thing on tape was the sax. Then after the sax was laid I'd put the MIDIL tracks individually down (in sync) on their own tracks on the multi-track. After this we'd record percussion, vocals and guitars as overdubs. So there was never a tracking session in a traditional sense for that whole record.
More Alternatives
Last summer I worked on a jazz project in Los Angeles. The artist was a piano player and had problems playing for more than an hour. It's difficult to track 15 songs when that's the case. What we ended up doing was to record his parts into a MIDI sequencer at his leisure and then went to a studio and recorded his parts to tape (analog 2-inch) using a Disklavier. The Disklavier is a piano made by Yamaha that is a very sophisticated player piano. The keys and pedals move and respond to a MIDI signal. Unlike a regular player piano which is generally note-on-note-off, this responds to 128 levels of velocity. We recorded this to tape along with a click track. We then scheduled an intensive two days of tracking with a bass player and drummer. They played their parts to the MIDI piano and click already on tape. Then we came back and re-cut the piano using a 9-foot Steinway at the studio. We scheduled overdub sessions around the breaks we had to take for the piano player. Overdub sessions generally don't last as long as tracking sessions and are easier to sandwich in around other activities. The whole record was done successfully in this manner and worked around the artist's physical limitations.
As you can see there are many ways to
track a record. With the modern tools we have you can be as creative as
you need to be to get the job done.
Comping
Vocal composites, called comping, is a common way to get a great vocal or instrumental performance on tape. It's part of the production process much in the way that doing different takes and creating different angles is a part of the process in making a film. The process can make a rough performer sound great and a great performer sound phenomenal. The procedure can be painstaking and frustrating but the payoff is that you're creating something that you'll be proud to have your name on. You never know where your product will end up and you certainly want it to reflect back on you in a positive way.
The Process
To make a vocal composite you're going to need the following:
A clearly written
or typed lyric sheet (probably a few copies)
4 or 5 open
tracks on your multi-track machine
For starters get your vocalist comfortable. This can mean the proper temperature, lighting, beverage (alcohol will dry out the vocal chords and is not recommended) and having as little non-essential personnel in the studio. Focus your attention on the vocalist at all times. Make them feel like you're there for them and to get good tracks. Encouragement is essential, that means not using negative words such as: don't, no, can't, but, etc. Don't tell the singer to relax, this is a sure way to create tension. Always emphasize the positive. Rely on the singer's knowledge of their instrument and how they can sing best. Don't try to squeeze them. At this point you're not only an engineer but a cheerleader, coach, psychiatrist and co-worker. For more on this see my feature on Recording Vocals.
The Performance
Have them sing the song down on 4 or more tracks. Remember to leave a track open as your compilation track (a non-adjacent track if you're in the analog domain). After this is done it's time sit with the artist and/or producer and listen and decide which pieces of which track go into your comp. Your lyric sheet will be your map and you'll make notes as you listen to the song line by line. Listening in small pieces is a good idea, this lets you microscope each word and take accurate notes. You can get as anal as you want about it. Stealing breaths even from another track to put into your comp. Words can be subdivided and pitches corrected by taking pieces from here or there.
Putting it All Together
Once the entire song is listened to it's time to record the comp. Digital machines are easier to work with because of the adjustable cross-fade but a good analog machine will do the job too. You will literally re-record the pieces from the original tracks to the new compilation track. Punching becomes very important here because your goal is to have the comp sound like it's not a comp. No pops, clicks, weird breaths or dropouts. If you're working in the digital domain you'll do your bouncing digitally, that is never making an D to A to D conversion. If you're working on an analog machine you'll use the patch bay to bounce from track to track, having an assistant is VERY helpful.
Then What?
Once you finish the comp you should be able to listen to it from top to bottom by itself and have no audible glitches. Sometimes there's a part that you just can't quite get right after many, many attempts. In this case listen to it in the track and see if it's audible. You may sometime get away with it. Also at the end of the comp you may still not have all the parts you need, in this case you can punch right into the comp and fix some stray notes or phrases, or if extensive work needs to be done go to a clean track and bounce it in later.
Find a good way to work and stick to
the procedure. Be flexible in the sense that you want to make the artist
comfortable but if someone wants you to cut a corner, tell them that both
your names are on this product and you want to make it a winner.
Making the Magic
Recording background vocals effectively can be challenging because of the many factors that come into play. The following factors can and will have an effect on the outcome of your tracks:
The comfort
of your vocalists
The size of
the group of singers
Placement of
the group in the room and around the microphone
Directional
response of the microphone(s) used
Balance within
the group
The number
of available tracks to record on
The Starting Gate
Let's start with the source and that is the singers. A background vocal session can be as simple as having one person sing all the parts up to a full choir of 15 or more. Making your singers comfortable in the room and with their headphone feeds can make the difference between a smooth running session and mutiny. I always go out into the studio and personally listen to each set of phones to make sure both sides are working, the volume is relatively the same between sets and that the phones are comfortable and clean. There's nothing more gross than putting on a greasy set of phones. I'll also make sure there are plenty of copies of the lyrics (in large type) on music stands with pencils on each stand. To keep reflections from the music stands from getting back to the mic I'll put a piece of acoustic foam or carpet on the stand.
Being able to use the same brand of headphones for each singer will save you a lot of volume hassles, but studios usually have a mix of brands. Some phones are just louder than others so having a headphone distribution box with separate volume controls is essential to making everyone happy with their individual levels. One man's ideal level is another's ear-shattering experience. I'll always put a carpet down on the floor to de-accentuate foot noise and toe tapping, in addition I'll use gobos to build a "room" around my singers and alleviate any large room reflections.
How Many People?
The number of people in your group will effect how you place them and the setup of microphones and the directional pattern. If I have 1-3 vocalists I'll generally choose one mic with a cardioid pattern and have the group arrange themselves around the mic. For 4-6 singers I might use a mic set in omni and arrange them around in a circle, or break them into two groups with two cardioid mics. To make it even more interesting you could face the mics back to back and have the group sing in a circle again as with the omni mic. What you gain with the two mics of course is that you can send them to two separate tracks. The logical split for a group like this would be male/female or low and high parts.
For a larger group you'll have to use
more mics. Last year I recorded a 15
piece choir and broke them up as follows:
Bass, Tenor, Alto and Sopranos all grouped in a large horseshoe pattern
around the room. Each group had their own cardioid pattern mic they huddled
around which was each sent to their own track (some groups were larger
and had two mics). This choir doubled on tape sounded absolutely huge when
split out in stereo. One more possibility for a large group is using a
Blumlein array and placing the group in a circle around the mics. This
is using two mics in figure 8 pattern and placing the capsules at 90 degree
angles. This gives you a 4-leaf clover pickup pattern and is very effective
for a mid-size group.
Balancing Act
With a smaller group around a single mic, getting and keeping the proper balance throughout the session will be one of your main focuses. The first few passes will tell you who sings louder and needs to be moved back and which parts might sound better more on-axis to the mic. Use your ears and move the singers around to taste. To keep them there I use a very simple trick. Before the session starts I'll go out and tear off a nice piece of white console adhesive tape and put it on the mic or music stand, one piece for each singer. When the singers are on the scene and I've got the blend I want, I'll tell each singer to take a piece of the tape and put it right in front of their toe. This will give them a mark to come back to repeatedly after breaks in the action and will keep the blend smooth.
Make sure before you start your session
that you have plenty of tracks to record on. Depending on the size of your
group and how thick of a sound
you're going for you might need more tracks than you originally anticipated.
Following these guidelines will help keep your session on track and your
tracks sounding professional.
Making the Most of Your Workspace
Sometimes you don't have the luxury of limitless tracks for your project. In that case you must look at your tracks as workspaces to collect ideas and then consolidate them. For instance, we talked a few weeks ago about comping vocals. In that case we discussed taking many tracks and choosing pieces of each one to make up a new whole. What we're talking about this week is taking many tracks and consolidating the whole of all of them into a new submixed whole. You can get this new submixed whole by bouncing or ping-ponging the tracks together onto a new track or a pair of stereo tracks.
The Process
Let's say that our production calls for a thick 30-voice background vocal choir sound but you only have two available tracks to put these parts on. In our case let's say we have a 16 track production studio and we've used 14 of our tracks already. It would be nice to be able to use 4 or six tracks to record our choir because of how the parts lay. We have tenors, altos and sopranos in groups in the studio and rather than making mix decisions on the spot it would be nice to be able to blend these parts later when the pressure of having 30 bodies to record is gone. There is a way to work with more available tracks by making work tapes.
Opening up More Tracks
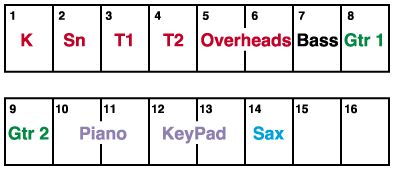
By making work tapes or slave reels you can open yourself up more workspace for your current and future overdubs. The process is simple and the first step is to look at your track sheet and see what groups of instruments you can submix down, see the drawing below for some suggestions:
The tracks that are colored the same will be grouped the same. You can group in stereo or mono depending on how many tracks you can afford to spend. In our case we'll be frugal and group the drums in stereo, bass by itself, sax by itself and guitars and keys each to their own tracks respectively. All this for a total of 6 tracks which will work out nicely later as you'll see.
Different Formats
Next we'll break down the submixing process for different recording formats.
ADATS/DA-88
If you're 16-tracks are made up of MDMs you would take your first tape (tracks 1-8) and bounce the drums to stereo on a fresh tape in your second machine (tracks 9-10). Then do a straight digital bounce of your bass and guitar each to their own tracks (bass to 11, guitar to 16). Put in your second tape into the first machine (original tape with guitar, sax and keys) then bounce your keys to track 13 of the second tape and the sax to track 14. It's a bit tricky because the guitar is split between two of our original machines but we can now consolidate Gtr2 and Gtr1 to track 12 of our work tape. Once you've combined the guitars you can erase the guitar on track 16 of your work tape, it was only their temporarily. Your work tape track sheet will look like this:

Hard Disk/VS-1680 Recording
In this case you'd do your submixing to virtual tracks then use other virtual tracks to record your new tracks to. Once you have all your new tracks done you can then mix these down to stereo so they'll occupy tracks 15-16. In this way you can trash your submixed work tracks and use all original tracks for mixdown.
Analog 16-track
This is tough because unless you have a resource to bounce tracks to in sync (such as a time-code DAT) you're in a bit of a dilemma. In cases where your technology is going to limit you I'd consider professional help. That means going into a pro-studio that's compatible with your format or one that has MDMs and book session time expressly to make work tapes. This limits your cash outlay to a few hours and your production will not suffer because of limited resources in your home/project studio. Don't forget that when bouncing on an analog tape machine you cannot bounce to adjacent tracks. The leakage between the tracks will cause feedback.
Notes on Bouncing
Bouncing means submixing. You achieve submixes by bussing your tracks to new tracks. Normally you'd use your multi-track busses to go from a microphone to the tape machine. In this case you're going to use the same busses to go from existing tracks to new tracks on the same machines.
Making work tapes is a great way to use
your resources to the fullest. Stay tuned next week for more production
tips to make your tracks better and better.
Having it Together
You only have one chance at a first impression. It may be cliché but it's absolutely true. When making music, people are trusting you with their "children" so to speak. Creative ideas are very personal and the responsibility of putting them on tape for all time and eternity is an important one. Doing your best to make the process a pleasant one not only makes you look good, but it puts the artist in a state of mind where creative juices can flow and good performances are made better.
Knowing Where You Are
Tape location is one of your first responsibilities in the studio. You have to be able to take the artist wherever he/she wants to go quickly and accurately. This requires a basic knowledge of song structure so you can speak the language of the music. Some common song structure labels are:
Intro - the
instrumental section at the very front of the song, often 4 bars. This
sets up the verse
Verse - First
vocal entrance that lays out the theme of the song
Chorus - Often
the strongest hook, and repeated often
Bridge - Usually
stated once in the song
Solo - Instrumental
break
"B" Section
- Often between the Verse and Chorus, sets up the chorus
Tag/Outro -
Sometime used to take the song out in place of a repetitive chorus and
fade
Chorus Outs
- Repetitive chorus until the song fades
How these labels are put together are dependent on the song structure. If you're in doubt as what to call a particular part of the song, ask the artist/writer. Assigning these parts tape location numbers is something you'll do early on in the session. Once the track has been laid out I'll make one pass and write down labels and numbers on the back of the track sheet. This is one document that you'll be careful not to lose and you'll have the track and location reference on the same sheet. I'll assign the number 0 to the very first part of the count off so if I come back at a later time, all my other numbers for Verse, Chorus etc. will line up. Once these numbers are down it's an easy task to plug in a number with a bit of pre-roll into your locator and take the artist to exactly the point they want to be. The alternative is guessing and is very frustrating for the talent and embarrassing for the engineer.
Finding Trouble Spots
Another great technique for making the session run smoothly is to write down numbers of potential trouble spots as an overdub is being recorded. For instance if you have an instrumentalist recording down an entire track, listen carefully as the performance goes down. As mistakes are made or the "pocket" is lost, write down numbers. After the take ask the artist what they think, they'll often say "I screwed up the second chorus" or some other suggestion. At that point you'll say "Ok, I know where you're talking about" and take them right to the spot. This usually impresses the heck out of the talent and let's them know you're paying attention. If they think the performance is perfect you might say "Ok, it was great but I heard a couple of spots I'd like you to listen to for possible fixes". Listen again with the artist and they'll often agree with you and fix these spots. People will learn to trust your ears that way and often defer to you and say "did you hear anything"? At that point you can point out spots and fix them.
All these things keep the session running
smoothly, instills confidence of the artist in your skills and makes for
clients that will keep returning.
Use Your Tools
A lot of what goes into being a professional is knowing how to use the simplest of tools to make your job easier. When you spend less time wrestling with technology you have more time to interface with the client and get the most out of any recording situation. One of these tools is the simple mult. The mult is a passive splitter, all this means is that it is not powered and will take any one input and split it to, at the most, three other outputs.
This week we're going to expand on the mult's usage to get your signal to many places at one time so you don't have to patch repeatedly. It's quite simple to set up your session for upcoming activity. For instance, if you're doing overdubs and know you'll be doing repeated passes to adjacent tracks, mult your inputs to all the tracks. That way when the time comes to jump to the new track, you're making a simple button push at the tape machine to ready the new track and safe the old. This is a lot easier than having to stand each time and deal with the patch bay or wait for an assistant to make your patches. If your talent is on a hot streak, having him/her wait for technical things can bog down a session and kill the creative moment.
Making it Happen
In practice you'd take the output of your direct out or multi-track buss and send it to a mult. The outputs of the mult will then go to the tracks that you've decided will be used for the overdubs. If you use more tracks than the mult outputs will handle (more than three), then and only then would you have to make a physical switch. There are a few rules to follow when using a mult:
Don't split
a mult into another mult thinking you'll get more outputs.
This dilutes your
signal too much and starts degrading it. You can't
let the sonic
quality become a victim of convenience.
A mult is a
splitter not a mixer. You can't put two inputs into a mult
and expect
a mixed output, it doesn't work that way.
Thinking Ahead
Another very simple thing you can do is to set up your entire console before you'll need to use it. For instance if you've got a 32 channel console and are only using 16, go ahead and setup the remainder of the console for usage. This way if someone decides you need to go to that extra 8-tracks of ADAT or whatever format you're using, you can easily just plug and play.
Another thing you can set up prior to usage is auxiliary sends and masters. Having all your aux masters up at unity gain can make patching and using new outboard gear a breeze. You just plug it in, send your signal from the aux and it will be at your OB gear in a flash. What's most frustrating in a session is to plug something in and not have it work because of a missed button, volume pot or other setting.
Keeping your head into your session means
planning ahead and using your tools to save you time and frustration down
the line. Stay tuned for more production tips next week.
What is an Offset
An offset the ability to move one tape machine's location in time in reference to another. In the world of Digital Audio Workstations, moving audio is as easy as copy and paste. This however is not everyone's chosen format. There over 150,000 MDMs out there, and there is still a lot of analog multi-track recording going on in the world. When you're using a linear format, being able to shift sounds around and not suffer too bad of a generation loss is a good thing. Using offsets gives you two things:
Production consistency
Signal integrity
by keeping your "bounce"
to one generation.
Targeting the Problem
One of the hardest things to achieve in producing and recording a song is to keep your tracks online with a certain quality from part to part. Think about this one example:
You have three background singers in to work on a track. After learning their parts you methodically record all the parts of the song which takes hours. Do you think their voices will change after 2 hours of singing? Will they sound the same on chorus one as they do on chorus three? Probably not, and this is something that will kill your consistency in a big way.
Another question is "what's the cleanest way to move a sax lick you especially like that sounds overdone in the verse but works great on the choruses? Now you get the idea that moving one or more tracks around from one end of the song to the other might be a desirable thing to do. You'll soon see how offsets will keep your signal integrity at a high standard and keep your tracks consistent from section to section.
Using SMPTE
Before we get into the mechanics of how to do an offset let's talk about time code. SMPTE time code was developed to be able to synchronize multiple sources of picture and recorded material in various combinations. It literally runs like a clock and LTC (Longitudinal time code) can be recorded on a tape track and thus be "locked" to the musical events recorded on the other tracks. When you have two machines with such time code printed on both, you can synchronize these two machines via a synchronizer. That is a box that reads both time codes, matches them up and tells one machine (slave) to follow another machine (master). This is achieved by giving the synchronizer control of the slave machine's transport functions. Because you're dealing with numbers, it's possible to put in an offset between the machines that will move the audio around to different places in relation to another machine. See the diagram below:
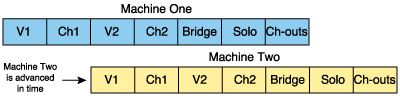
As you see it's now possible to line
up sections of the song that weren't originally recorded together. Tune
in next week to see the nuts and bolts of this useful process.
More about Time Code
As we discussed last time, if you've got SMPTE time code on two machines (audio, video or a computer) you can synch and then do offsets between them. The time code could be actually printed on a track or internally generated by the machine. In the case of ADATs it's generated by the BRC or with DA-88s by the optional synch card. With analog tape you have to sacrifice a track and print the SMPTE. Once this is done if you have the correct software and hardware you can synch two machines and they'll run together time after time. One machine will follow another during rewind, fast forward and will stop and play when the other does.
SMPTE looks like this: 00:00:00:00.00, this corresponds to Hours:Minutes:Seconds:Frames.Bits. There are 24 hours in a day, sixty minutes to the hour, sixty seconds to the minute, 30 frames to a second, and 100 bits per frame. Thirty frames per second is being used in our case and is very common in audio synchronization. In reality there are other types of SMPTE, 24 frame, 25 frame, 30 drop frame and 29.97. They have their uses for synching film in US and European formats and black and white and color video. All this aside we will use what's called 30 non-drop.
How to Start
The first step is to actually want to move some tracks around. This could be a lead vocal, backgrounds and instrumental part or whatever. I'm going to use background vocals as an example. This works especially well on backgrounds because of the nature of the parts. They are repetitive and need to be consistent sounding from chorus to chorus. Getting a great performance is not difficult with good singers, however even the most seasoned professionals will change their performance over the course of a session. Usually the first choruses that you record will be the most fresh, these are the ones you'd like to have throughout your production. I like to start at the final choruses at the end of the song to get a feel and flow going. This is because they are usually repeated more than once and it's easy to let the tape run a bit so the singers can get a feel. Once all the parts are figured out and these end choruses are recorded you can fly those parts into the other choruses. If you have the technique down this could be done while the singer's take a break. Here's the course of events:
Record the out-choruses
(choruses at the end of the song)
Fly them to
their "new" locations in the song using offsets
Listen down
for pocket as you go (how the parts line up with the beat)
Have the singers
fill in any turnarounds or extra parts that are needed
Not only does this expedite the process
but it opens you up to work on more material because your singers are still
fresh. Next week I'll give you the formula for adding and subtracting SMPTE
numbers.
Here We Go
In the last two weeks we've established the whys behind moving tracks around using offsets, this week we get into the hows. The difficulty with adding or subtracting SMPTE numbers is that the base changes for each set of numbers. SMPTE is expressed as 00:00:00:00.00, this corresponds to Hours:Minutes:Seconds:Frames.Bits. There are 24 hours in a day, 60 minutes in an hour, 60 seconds in a minute, 30 frames per second and 100 bits per second. So you can't just add and subtract them like base 10 numbers as we're used to. The easiest way I've found is to express minutes and seconds all as frames. The formula to do this is follows in Step 1. The remaining steps lay out the process of getting to your offset number:
Step 1: (minutes(60)
+ seconds)30 + frames
Step 2: Do
your subtraction or addition in frames
Step 3: Divide
the answer by 30 to get seconds
Step 4: multiply
the numbers after the decimal point by 30 to get the number of frames.
Example:
27:10:00 - 25:32:14 = ???
Now follow Step 1 and express the two
sets of numbers as frames.
27:10:00 expressed as frames is 48900,
25:32:14 expressed as frames is 45974
48900 - 45974 = 2926 (Step 2)
2926 back into seconds and frames is 97.53 (Step 3, 2926 ÷ 30 = 97.53)
.53 x 30 = 15.90 (Step 4, .53 x 30 = 15.90 the .90 is expressed in percentage of frames and you can enter it into your offset as bits) so your answer is 97 seconds and 15.90 frames or 1:37:15.90. This is the number that would be entered into the offset window of your BRC, synchronizer or whatever you're using to offset your machines.
How Do You Get There?
The math is a bit difficult at first but once you do it a few times it's a lot easier. The question remains though is where do you get these SMPTE numbers to start with? This is very simple to do, you do need a SMPTE reader of some kind and of course you need SMPTE striped and tied to the computer or tape or whatever you're synching. Let's say you want to offset your first chorus so it lines up with your second chorus. You'd simply have to grab the numbers at the downbeat of the first chorus and then grab the numbers at the downbeat of the second chorus. Setup the numbers as above and do the math. You then enter the answer as the offset.
Positive or Negative Offset?
You'll run into the fact that sometime you might want to move some part BACK in time from the end of the song. In that case you'd have a negative offset. The numbers in the answer are the same you just ad the minus at the front. What gets difficult here is when you're doing the final tweak to make the part sit right in the pocket by moving the frames or bits around a bit. With a negative offset the negative numbers move the part you're moving FORWARD in time in the song. It gets a bit confusing but by doing major shifts as a test you can see what's what and get the routine down.
The Final Tweak
As I mentioned above the numbers you grab will be in the ballpark and will need some final tweaks. This is as simple as going into your offset numbers and moving it up or down by frames or bits to make the part sit right in the pocket. As with anything else you'll get better at this over time.
Next week we'll explore this further.
I'll give you more examples and show you how it's even easier if you know
your BPM (beats per minute). Stay tuned.
Here We Go Again
WARNING: This will not work if your song changes tempo, refer to last week's feature in this case.
The steps are as follows:
60 divided by
BPM = 1 beat in seconds
1 beat in seconds
X total beats you want to offset = total offset
The numbers
remaining to right of decimal point are multiplied by
30. The answer
is expressed as frames and sub-frames.
Now you can figure out the SMPTE offset for any tempo and number of bars/beats. There are two examples that follow and then 5 problems for you to figure out yourself.
Example One:
Your song is at 60 BPM, 4/4 time and you need an offset of 4 bars. What is the SMPTE offset for 4 bars at 60 BPM. In other words what is the difference between the SMPTE number at bar 1 beat 1 and bar 5 beat 1.
Answer
60/60 =1
1X16 = 16 (you
get 16 by multiplying 4 bars by 4 beats per bar)
The answer is 16 seconds offset (00:00:16:.00) Since there are no numbers to the right of the decimal point you just leave it at zero.
Example Two:
Your song is at 89 BPM, 4/4 time. What is the SMPTE offset for 8 bars.
60/89 = .6741
(for accuracy use 4 numbers to the right of the decimal point)
.6741 X 32
= 21.5730 (21 is your partial answer in seconds)
.5730 X 30
= 17.19
The answer is 00:21:17.19
Important!: If you're wanting to bring a part from a later part of the song back to an earlier time then your offset would be a negative offset (same numbers proceeded by a minus).
Figure the 5 following problems and express the answer in SMPTE numbers (00:00:00.00)
1. Your BPM is 75 in 4/4 time. What is the offset for 8 bars?
2. Your BPM is 168 in 3/4 time. What is the offset for 4 bars?
3. Your BPM is 193.5 in 4/4 time. What is the offset for 20 bars?
4. Your BPM is 124 in 5/4 time. What is the offset for 32 bars?
5. Your BPM is 160 in 4/4 time. What is the offset for 16 bars?
Share your answers with the rest of us
on the bulletin board. Next week I'll
post the answers so stay tuned.
The End, or Is It?
Here are the answers to last week's SMPTE offset problems. This could be the start of something big with your productions. Use this formula to make your tracks equal more than the source material. That's the secret of great recordings by the way!
1. Your BPM is 75 in 4/4 time. What is the offset for 8 bars?
60÷75=.80
.80X32=25.60
(25 seconds is the partial answer)
.60X30=18.00
The answer
is 00:25:18.00
2. Your BPM is 168 in 3/4 time. What is the offset for 4 bars?
60÷168=.36
.36X12=4.32
(4 seconds is the partial answer)
.32X30=9.60
The answer
is 00:04:09.60
3. Your BPM is 193.5 in 4/4 time. What is the offset for 20 bars?
60÷193.5=.31
.31X80=24.80
(24 seconds is the partial answer)
.80X30=24.00
The answer
is 00:24:24.00
4. Your BPM is 124 in 5/4 time. What is the offset for 32 bars?
60÷124=.48
.48X160=76.80
(76 seconds is the partial answer which is 01:16)
.80X30=24.30
The answer
is 01:16:24.30
5. Your BPM is 160 in 4/4 time. What is the offset for 16 bars?
60÷160=.38
.38X64=24.32
(24 seconds is your partial answer)
.32X30=9.60
The answer
is 00:24:09.32
Some Current Hot Tips
I'm in the middle of a great project. We've cut basic bass and drum tracks along with some sequenced tracks. I had one thing happen today that I thought I'd pass along to you. The producer of this project is a very talented drummer and singer and has a real vision for the project. This is a welcome thing because if you have a firm direction then you've won half the battle. After all knowing where you're going is the most important part of a journey (at least in general anyway). The producer, being a drummer, was very locked into having the time be solid on the project. So we laid click templates for all the songs. This was an integral part of the headphone mix and worked on all the songs very well, until today. The last song we cut was giving us all kinds of problems. The pocket of the song wasn't locking and after multiple takes I asked if the problem might not be tempo related. I suggested bagging the click along with the scratch guitar and vocal tracks that the artist had laid. This meant that the drummer and bass player would play the track live to tape, no click.
The Setup
To implement this so that the players
would know where the arrangement was going I took the talk-back mic and
quickly patched it to the console and into the headphone mix. The drummer
was the only player getting a headphone feed, the bass player (Shem Shroek,
an awesome L.A. studio and tour player) was in the control room with the
artist. So the drummer counted off the tune and the singer sang into the
talk-back mic and the bass player played along. It took one take to get
it. It was beautiful, in the pocket and had a LOT of spirit. So.......the
lesson learned here is: Have a vision for your production but don't let
that vision stifle the creative edge, be flexible.